Lovely Framed Wedding Vows
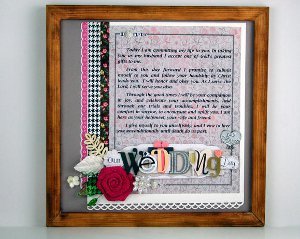
Let these Lovely Framed Wedding Vows act as a constant reminder of the promises you made to each other on your special day. This meaningful and lovely gift would be great to display in the home or bedroom to help remind each other what's really important. Also great to give as a 1-year anniversary gift, this lovely DIY wedding craft is simple, yet meaningful.

Materials:
- AdvantEdge™ Punch System Starter Set
- Lacy Doubles Small Punch Cartridge
- SureCut™ Deluxe Craft Paper Trimmer (12")
- The Original Orange-Handled Scissors™ (8")
- 12” x 12” Frame or Shadowbox
- Floral Paper (Karen Foster Design)
- Houndstooth Paper (Bazzill Basics)
- Rosebud Fabric Tape (Maya Road)
- Burlap Flower (Maya Road)
- Leaf Stick Pin (Maya Road)
- Beaded Flower (Maya Road)
- Paper Leaf & Flower (Prima Marketing Flowers)
- ‘Our Wedding Day’ Dimensional Stacked Statement (Karen Foster Design)
- Adhesive Backed Rhinestones (Little Yellow Bicycle)
- Pewter ‘LOVE’ Brad (Karen Foster Design)
Instructions:
- First, you’ll gather some cardstock, patterned paper and a few miscellaneous embellishments. Then, open your word processing program, insert a text box and size it to 7” x 9”. Format the text box to include a double lined border. Type up the vows, and format them using the font size and type that you desire. Print onto regular printer paper to ensure the spacing is exactly what you like.

- Using the AdvantEdge Border Punch System along with the adapter and the Lacy Doubles Interchangeable Border Punch Cartridge, punch down the length of a 12” piece of cream cardstock. Use your paper trimmer to cut the punched edge from the cardstock leaving a ¼” wide cardstock strip attached.

- Once satisfied with the text spacing and placement, cut a light-colored patterned paper to 8 ½” x 11”. You’ll want to choose one that has a subtle print on it so it doesn’t compete visually with the text you’re printing on it. Place paper in your printer and print out your text once again. Trim patterned paper so there is a ½” border outside the printed text box. Adhere printed vows onto cream colored cardstock and trim, leaving a ¼” border. Adhere lacy doubles punched border strip along the bottom edge and trim to proper width.
- Adhere vows to a 12” x 12” piece of grey cardstock, right aligned. Cut a 1” x 11” strip of patterned paper. Adhere vertically to the left-hand side of the printed vows. Embellish with a strip of fabric tape and a sticker border.

- Add the ‘Our Wedding Day’ Stacked Statement to the blank space at the bottom portion of the wedding vows. Finish embellishing with additional cluster of embellishments in the lower left corner including resin flowers, burlap rosette, stick pin and beads all from Maya Road. Be mindful when you choose your embellishments of whether or not you’re using a flat frame with glass. If your embellishments are extra bulky and you want them to be behind glass, you might consider using a shadowbox frame instead.

Read NextLovely Framed Wedding Vows


