Big Circle Clock
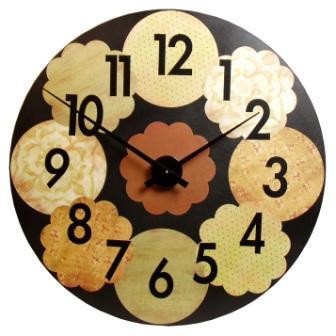
Make your own decorative clock with a circle of wood, clock kit and scrapbook paper circles. You can paint the background of the clock any color you wish and the numerals come in the kit.

Materials:
- Walnut Hollow® #26982 Big Time Clock™
- 38” Circle of Baltic Birch Plywood or Fiberboard
- Paint - Black
- Adhesive Spray
- (9) 12”x12” Scrapbook Paper (5) Scallop edge and (4) Circles – The Scrapbook Store can die cut paper to correct shape.
- 2 screw eyes and wire
- Other Supplies: AA battery, brayer, chalk, foam brush, large flat brush, pencil, piece of white paper, sandpaper, ½” screw, screw driver, scissors, soft cloth, spray varnish, wood sealer, paper towel
- Read through entire instructions before beginning project.
Instructions:
- To prepare wood for painting, use sandpaper to lightly sand entire wood surface. Remove dust with paper towel.
- Use foam brush to apply one coat of wood sealer to entire wood surface. (To make an effective wood sealer, mix equal parts Clear Shellac and Denatured Alcohol. Store wood sealer in an airtight container.) Let dry. Use fine sandpaper to smooth surface. Remove dust with paper towel.
- Use large flat brush to apply black paint to entire wood surface. Let dry. Apply second coat if needed. Let dry. Apply 2-3 coats of spray varnish.
- Refer to photo for placement. Determine where each scrapbook paper die cut will be located. Mark with chalk (Make sure it can be easily removed with a soft cloth or paper towel). Apply spray adhesive to the back of a circle die cut. Press into position. Use your hand or a brayer to smooth out any wrinkles. Continue to adhere the remaining circles in the same manner. Adhere the scallop die cuts evenly between each circle. Adhere a scallop die cut in the center of the large clock.
- Follow directions on packaging for the Big Time Clock and use template to place numerals around clock. Since the Big Time Clock will be mounted on wood and not the wall, the directions for mounting the clock movement will be a little different. Using a piece of white paper or tracing paper, place base of clock on paper and trace around circle with pencil. Cut out circle with scissors. Hold circle on back of clock base and locate the mounting hole and punch through with a pencil. Place circle template in center of clock. Line up mounting hole with the number 12. Mark hole with pencil. Use screw driver to partially insert a small screw into wood. Follow package directions for inserting battery.
- To create a hanger on back of clock, insert two screw eyes and attach wire as if hanging a picture.
- Attach clock base on screw in center of clock
Read NextHow to Decoupage on Wood
Your Recently Viewed Projects
Weberme
May 31, 2017
I have gotto make this clock. This is just what I was looking for. I absolutely love it and I want something so different. I have been wanting to make my own but there is nowhere around me that has the complete clock making supplies. Can someone tell me a good place online? I think instead of painting it i will decoupage it and then put on circles and then kit. Great tutorial and Thanks for the perfect idea.
smokeybosman 80257 83
Aug 19, 2014
I am so glad that I discovered this website. I simply love it to bits. It is one of the most useful websites to be found. I live in South Africa so I have to adjust my times with yours or versa visa
Melissa Ryan
Aug 19, 2014
Hi Smokeybosman--Thank you so much for your kind words! We're glad you like FaveCrafts.com! Don't forget to sign up for our newsletters so you can get all the new projects directly in your inbox every week!--FaveCrafts Editors
Report Inappropriate Comment
Are you sure you would like to report this comment? It will be flagged for our moderators to take action.
Thank you for taking the time to improve the content on our site.

