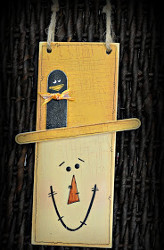
Smiley Scarecrow
Scarecrows are meant to scare birds away, but this Smiley Scarecrow by Megpie Designs will keep the fuzzy critters in your yard. It is a fun and easy wood project that shows you how to build a scarecrow in no time. Use a paintbrush to give this wooden person a face, a hat, or any other fun additions to its personality. Wood shop projects are often intimidating, but this one is simple and fun.

Materials:
- Wood Slat (sold in packages of six)
- Craft Stick
- Jumbo Craft Stick,
- Hatch-mark background stamp,
- Acrylic paints: antique gold, antique white,
- Black, white, jack-o-lantern orange,
- Honey brown, Sparkle Glaze,
- Multi-Purpose Sealer
- Sponge roller, 1" wash brush,
- 1/2" flat brush, script liner brush
- Brown ink pad, scrap of ribbon,
- Glue gun and glue sticks
- Pink powder blush and sponge dauber
- 12" length of jute for hanging,
- Eyelet and snap punch tool, hand drill, or drill press,
- Permanent black marker
Instructions:
-
Use sponge roller to base coat top half of wood slat antique gold; also paint the craft stick antique gold.

-
Attach hat brim with glue gun, then base coat the bottom half of the wood slat antique white
-
Don't forget to paint the backs and the sides of each slat

-
I found this background stamp a few years ago. It makes the absolute "perfect" cross-hatch pattern on my straw hats and burlap texture on my scarecrow faces. Rub the stamp pad over the stamp, and stamp the craft stick (hat brim,) top, and bottom half of scarecrow

-
Next, shade around the edges of the rectangles and the top half of the craft stick.

-
Dip a 1/2" wash brush into water, then dip one corner into a small puddle of honey brown paint. Drag the brush back and forth on the palette to distribute the paint gradually

-
Secure the hat brim to the hat with the glue gun.

-
Blush cheeks with sponge dauber and pink powder blush.

-
Use a stylus or the end of a paintbrush handle to dot the eyes.
-
Thin black paint with water to an inky consistency, and use the liner brush to paint a mouth on the scarecrow.
-
Use the liner brush and jack-o-lantern orange to add a triangle nose to the scarecrow.
-
Here's how to make the cute black crow poking up out of the hat brim
-
Paint the jumbo craft stick black. Don't forget to paint the sides.
-
Use the sanding block to sand around the edges of the craft stick.
-
Then trim off the end of the craft stick.

-
Dip dot the eyes with white paint.
-
This photo (above) shows step-by-step how to paint the beak with antique gold and a script liner brush.

-
When completely dry, brush on a coat of Sparkle Glaze.
-
Secure the crow to the hat with the glue gun.
-
Make two holes in the top corners of the slat scarecrow.
-
Thread one end of the jute through the hole and knot the ends.
-
Thread the other end of the jute through the second hole, creating a hanger.
-
Tie a knot with the ribbon scrap and attach to the crow's neck.
-
Use the permanent black marker to outline the hat, hat brim, and face.
-
Use thinned black paint to make eyebrows and stitch marks
on the nose and mouth.
Read NextHow to Decoupage on Wood
Your Recently Viewed Projects
Hug A Pug
Apr 29, 2014
This is so adorable & I cannot wait to make some. Could you please let me know where you purchased most of your supplies to make it. I would certainly appreciate it. Thanks so very much, Hug A Pug
Melissa Ryan
Apr 30, 2014
Hi Hug A Pug--thanks for the comment. We suggest shopping for craft supplies on our online craft store, www.cutratecrafts.com. If you can't find what you need there, we also suggest checking your local craft store, such as Michaels or Hobby Lobby. Hope that helps! --FaveCrafts Editor
Report Inappropriate Comment
Are you sure you would like to report this comment? It will be flagged for our moderators to take action.
Thank you for taking the time to improve the content on our site.


![Decoupage Wooden Coat Hangers [3 Ways]](http://irepo.primecp.com/2017/07/338694/Decoupage-Wooden-Coat-Hangers-3-Ways-2_Large400_ID-2327997.jpg?v=2327997)
