Homemade Poinsettia Christmas Card

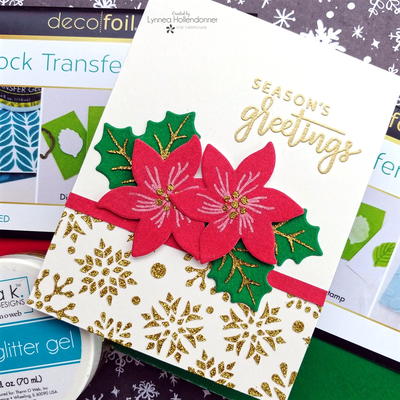
Homemade Christmas cards are almost always the way to go. DIY cards stand out, and give you the opportunity to personalize each card for the loved one who will be receiving it. This beautiful poinsettia Christmas card tutorial will show you how to make incredible cards at home. With this simple project guide, you can create memorable DIY Christmas cards! Follow these steps and put a little extra love into each card. Everyone who receives one of your festive poinsettia Christmas cards will know they are loved!
PLUS Enter to win the Stamp n Stencil + Deco Foil Flock Prize Pack Giveaway as part of our 12 Days of Christmas in July giveaways as well as our 12 Days Grand Prize!
Time to CompleteIn an evening
Primary TechniqueGeneral Paper Crafting
Project or Page SizeCard
Type of Paper UsedCardstock

HolidayChristmas
Materials List
- Wishing You Joy stamp set
- Wishing You Joy stencil
- Wishing You Joy die set
- Emerald Green Deco Foil Flock Transfer Sheets
- Ruby Red Deco Foil Flock Transfer Sheets
- Gina K Designs Gold Glitz Glitter Gel
- Pixie Spray
- Gina K Designs Masking Magic
- iCraft Ultra Bond Liquid Adhesive
- iCraft Easy Cut 6x6 Adhesive Sheets
- Gina K Designs White Foam Squares
- 1.5 inch purple tape
- Stencil pal
- Blank card or cardstock
Instructions
-
Use the Masking Magic to mask off the top 2/3 of your blank card.
-
Spray the back of the Wishing You Joy stencil with Pixie Spray, then adhere the stencil to your masked card.
-
Use your stencil pal to add the Gold Gina K Designs Glitz Glitter Gel to the bottom portion of the card (over the stencil). Peel off the stencil and the masking from the card.
-
Cut the poinsettias and leaves in the Wishing You Joy die set from Deco Foil Flock Transfer Sheets. Use pieces of iCraft 6x6 Double Sided Adhesive Sheets to add adhesive to cardstock, then add it face down into the adhesive and run it through a die cutting machine.
The pressure of the machine presses the flock into the adhesive sheets, which will give you a flawless transfer when you peel away the flock. -
Complete step 4 with the Ruby Red and Emerald Green Deco Foil Flock Transfer Sheets, then die cut the red piece with the poinsetties die and the green piece with the leaf die from the Wishing You Joy die set.
-
If you wish to embellish the pieces further:
Stamp the center of the poinsettia and white heat emboss it onto both poinsettias.
Use the Wishing You Joy stencil and the Gold Glitz Glitter Gel again to add details to the poinsettias and leaves. -
Stamp and gold heat emboss a festive sentiment from the Wishing You Joy stamp set in the top right corner of the card.
-
Using iCraft Ultra Bond Liquid Adhesive, add an extra strip of the Ruby Red Deco Foil Flock at the edge of the stenciling on the card.
-
Add the floral elements using iCraft Ultra Bond Liquid Adhesive. Start with the leaves in the background, then add the flowers. If you want, give the flowers some extra oomph by popping them up with the Gina K Designs White Foam Adhesive Squares.

