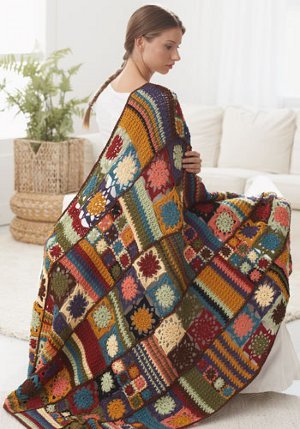
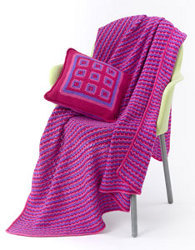
Pillow and Throw for Tweens
This is the perfect crochet pattern for that tween in your life. The size will fit her just great and the bright pink color will add pizazz to her life.

Materials:
- Caron International's Simply Soft (100% acrylic; 6 oz/170 g, 315 yds/288 m skein):
- #9748 Rubine Red (A), 3 skeins
- Caron International's Simply Soft Brites
- (100% acrylic; 6 oz/170 g, 315 yds/288 m skein):
- #9604 Watermelon (B), 3 skeins
- #9610 Grape (C), 3 skeins
- One crochet hook size US F-5 (4 mm), or size to obtain gauge
- Yarn needle
GAUGE
In (sc, ch 3) pattern, using US F-5 (4 mm) hook, 21 sts (5 pattern repeats) and 18 rows = 4"/10 cm
STITCHES USED
Chain (ch)
Single crochet (sc)
Slip stitch (slip st)
COLOR PATTERN
*Work 1 row with A, 1 row with B, 1 row with C; repeat from * throughout for color pattern.
NOTES
1) Always change color when completing the last single crochet of each row.
2) To change color, insert hook in last single crochet of row and draw up a loop of old color, yarn over with new color and draw through the 2 loops on hook to complete stitch.
3) Do not fasten off old color at end of each row. Carry color not in use along the side of work.
THROW
With A, ch 254.
Row 1: With A, skip first ch, *sc in next ch, ch 3, skip next 3 ch; repeat from * across to last ch, sc in last ch; change to B in last sc, turn—63 ch-3 space.
Row 2 (RS): With B, ch 1, sc in first sc, *ch 3, skip next ch-3 space, sc in next sc; repeat from * across; change to C in last sc, turn.
Repeat Row 2, changing colors as specified in Color Pattern, until piece measures approximately 55 1/2"/141 cm. End with a C row and change to A in last sc of last row. Do not fasten off.
FINISHING
Border
Note: Work now proceeds in rounds.
Round 1: With A, ch 1, work sc evenly spaced around entire afghan, working 3 sc in each corner and ensuring that you crochet over the strands that have been carried up the sides; join with slip st in first sc. Fasten off A.
Round 2: Working in back loops only, join B with slip st in any sc of Round 1, slip st in each sc around. Cut B and pull end through the first slip st to the back of the work to fasten off.
Using yarn needle, weave in ends.
PILLOW
FINISHED MEASUREMENTS: Pillow measures approximately 14 x 14"/35.5 x 35.5 cm
MATERIALS
- Caron International's Simply Soft (100% acrylic; 6 oz/170 g, 315 yds/288 m skein):
- #9748 Rubine Red (A), 1 skein
- Caron International's Simply Soft Brites
- (100% acrylic; 6 oz/170 g, 315 yds/288 m skein):
- #9610 Grape (B), 1 skein
- #9604 Watermelon (C), 1 skein
- One crochet hook size US F-5 (4 mm), or size to obtain gauge
- 14 x 14"/35.5 x 35.5 cm pillow form
- Yarn needle
GAUGE
One pillow front motif measures approximately 2 1/2 x 2 1/2"/6.5 x 6.5 cm
Rounds 1–5 of pillow back measure approximately 4 x 4"/10 x 10 cm
Completed pillow front and back each measure approximately 13 1/2 x 13 1/2"/34.5 x 34.5 cm
STITCHES USED
Chain (ch)
Reverse single crochet (rev sc)
Single crochet (sc)
Slip stitch (slip st)
NOTE
1) To change color in slip st, insert hook in indicated chain-space, yarn over with new color and draw through both loops on hook to complete slip st.
2) When instructed to not fasten off a color, carry the color up wrong side of work.
HELPFUL
Weave in yarn ends as you work the individual motifs, to reduce the amount of weaving in during finishing and to keep the motif sturdy.
PILLOW FRONT
Motif (make 9)
With A, ch 3; join with slip st in first ch to form a ring.
Round 1: With A, ch 1, *3 sc in ring, ch 2; repeat from * 3 more times; join with slip st in first sc, slip st in each st to first ch-2 sp, slip st in first ch-2 sp and change to B—12 sc and 4 ch-2 sp. Do not fasten off A.
Round 2: With B, ch 1, *(sc, ch 2, sc) in ch-2 sp, sc in next 3 sc; repeat from * 3 more times; join with slip st in first sc, slip st in first ch-2 sp and change to C—20 sc and 4 ch-2 sp. Fasten off B.
Round 3: With C, ch 1, *(sc, ch 2, sc) in ch-2 sp, sc in next 5 sc; repeat from * 3 more times; join with slip st in first sc, slip st in first ch-2 sp and change to A—28 sc and 4 ch-2 sp. Fasten off C.
Round 4: With A, ch 1, *(sc, ch 2, sc) in ch-2 sp, sc in next 7 sc; repeat from * 3 more times; join with slip st in first sc—36 sc and 4 ch-2 sp. Fasten off A.
Arrange 9 motifs in a square, 3 motifs wide by 3 motifs high. Using yarn needle, whipstitch motifs together. Each side of a motif consists of 9 sc and 2 corner ch (one ch from each corner ch-2 sp), for a total of 11 sts along each side.
Join A with slip st in any corner ch-2 sp of 9 motif square.
Round 1: With A, ch 1, *(sc, ch 2, sc) in ch-2 sp, [sc in next 9 sc, sc in corner ch of current motif, sc in corner ch of next motif] 2 times, sc in next 9 sc (31 sc worked along side); repeat from * 3 more times; join with slip st in first sc, slip st in first ch-2 sp and change to B. Fasten off A.
Rounds 2 and 3: With B, ch 1, *(sc, ch 2, sc) in ch-2 sp, sc in each sc to next ch-2 sp; repeat from * 3 more times; join with slip st in first sc, slip st in first ch-2 sp and change to C in last slip st of Round 3. Fasten off B.
Rounds 4 and 5: With C, ch 1, *(sc, ch 2, sc) in ch-2 sp, sc in each sc to next ch-2 sp; repeat from * 3 more times; join with slip st in first sc, slip st in first ch-2 sp and change to A in last slip st of Round 5. Fasten off C.
Rounds 6–13: With A, ch 1, *(sc, ch 2, sc) in ch-2 sp, sc in each sc to next ch-2 sp; repeat from * 3 more times; join with slip st in first sc, slip st in first ch-2 sp. Fasten off A.
PILLOW BACK
With A, ch 8.
Row 1: Sc in second ch from hook and in each remaining ch across, turn—7 sc.
Rows 2–7: Ch 1, sc in each sc across, turn.
Note: Work now proceeds in rounds.
Round 1: With A, ch 1, (sc, ch 2, sc) in first sc (corner made), sc in each sc across to last sc, (sc, ch 2, sc) in last sc; pivot to work in ends of rows along side, work 5 sc evenly spaced along side; pivot to work in free loops along opposite side of foundation ch, (sc, ch 2, sc) in first ch, sc in next 5 ch, (sc, ch 2, sc) in last ch; pivot to work in ends of rows along side, work 5 sc evenly spaced along side; join with slip st in first sc, slip st in first ch-2 sp and change to B. Do not fasten off A.
Round 2: With B, ch 1, *(sc, ch 2, sc) in ch-2 sp, sc in each sc to next ch-2 sp; repeat from * 3 more times; join with slip st in first sc, slip st in first ch-2 sp and change to C—36 sc and 4 ch-2 sp. Do not fasten off B.
Round 3: With C, ch 1, *(sc, ch 2, sc) in ch-2 sp, sc in each sc to next ch-2 sp; repeat from * 3 more times; join with slip st in first sc, slip st in first ch-2 sp and change to A—44 sc and 4 ch-2 sp. Do not fasten off C.
Round 4: With A, ch 1, *(sc, ch 2, sc) in ch-2 sp, sc in each sc to next ch-2 sp; repeat from * 3 more times; join with slip st in first sc, slip st in first ch-2 sp and change to B—52 sc and 4 ch-2 sp. Do not fasten off A.
Rounds 5–25: Repeat Rounds 2–4 seven times.
Round 26: Repeat Round 2.
Fasten off.
FINISHING
Using yarn needle, weave in all ends.
Border
Hold WS of pillow back and front facing each other. Working through both thicknesses, join B with slip st in any ch-2 sp.
Round 1: With B, ch 1, working through both thicknesses, *3 sc in ch-2 sp, sc in each sc across to next ch-2 sp*; repeat from * to * 2 more times; insert pillow form; repeat from * to * once more; join with slip st in first sc. Fasten off B.
Round 2: Join A with slip st in any sc of Round 1; ch 1, work rev sc around; join with slip st in beginning ch-1. Fasten off A.
Using yarn needle, weave in ends.
Read NextArrow Stitch Crochet Afghan
Your Recently Viewed Projects
Thanks for your comment. Don't forget to share!
geyerd 1443828
May 10, 2014
I am new at crocheting and I have completed the first colour. I am not sure what "turn63 ch-3 space" means. Thank you Deb
FaveCrafts Editor JL
May 12, 2014
Hi there, For specific pattern-related questions, we suggest contacting the designer directly via their company profile (http://www.favecrafts.com/Craft-Manufacturers/Car == on-Yarns). We also suggest posting your question on our Facebook page so the community can weigh in. Thanks!
CassandFay
Apr 26, 2010
I love this with just the right colors. I could also add matching granny squares around the border .
Report Inappropriate Comment
Are you sure you would like to report this comment? It will be flagged for our moderators to take action.
Thank you for taking the time to improve the content on our site.