Butterfly Buttons Stamped Card
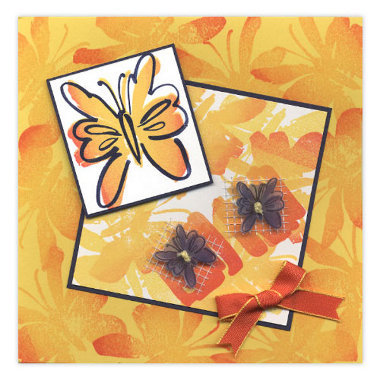
A delightful stamped card of sunshine colors is sure to effuse light and joy.You create some of the butterfly embellishments on this card from Posh Impressions with shrink plastic.

Materials:
- Butterfly Mini Set
- Blending Blox: Shades of Orange, Shades of Blue (BB-01)
- White Magic Mesh (MM0001-140024)
- Midnight Blue Stazon ink (SO-01)
- Cardstocks: Bright Yellow, White, Navy Blue
- Navy Blue Marvy Marker
- Ruff ‘n’ Ready Shrink Plastic
- Orange Magic Mesh
- 3/8” wide decorative orange ribbon
- Yellow embroidery floss
- Adhesive
- Clear Liquid Adhesive
- Mounting Tape
- Scissors
- Heat Tool
- Sewing Needle
- 1/8” hole punch
Instructions:
- Cut pieces: From bright yellow cardstock: 5 ½” x 11” (folded for a 5 1/2” square card). From white cardstock: 3 ½” square and 2” x 2 1/4”. From navy cardstock: 3 5/8” square and 2 1/8” x 2 3/8”. Cut two small square of Magic Mesh, each 1” square.
- Create background on edge of card front by randomly stamping solid butterfly image using Orange Blending Blox. Repeat process on white square. Using Orange Blending Blox, stamp two solid background squares on white square. Stamp one butterfly image on small white piece and overstamp outline using navy brush marker. Mat pieces with navy cardstock.
- Stamp two solid butterflies on shrink plastic using Blue Blending Blox. Overstamp outline with Midnight Blue ink. Carefully cut close to edges, punch two holes on bodies of butterflies. Shrink with heat tool, bending wings upward while still warm. Sew embroidery floss through holes and tie in knots. Cut close to ends. Keep the ends from raveling with a drop of clear liquid adhesive.
- Assemble finished card: Adhere Magic Mesh over solid background squares. Adhere butterflies on Magic Mesh. Using mounting tape, attach single butterfly element to corner of white square. Mount entire element to front of card. Tie a ribbon bow and attach underneath butterflies.
Read Next64 Handmade Cards for Every Occasion

