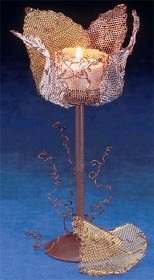
Autumn Reflections Candle Holder
Create an elegant Autumn Reflections Candle Holder from wire mesh from AMACO.

Materials:
- AMACO® WireForm®:
- 6" x 8" piece of Impression Mesh, Copper, 1/8" pattern
- 5" x 6" piece of Sparkle Mesh, Aluminum, 1/8" pattern
- 5" x 6" piece of Designer’s Mesh, Brass, 18 mesh
- AMACO® Fun Wire™: 14 ft. of Brown; 24 gauge
- 6" length of 5/16" diameter dowel
- Two large wooden craft disks (1/2" x 21/2")
- October Brown spray paint
- Tea light candle
- Glue gun & glue sticks
- Pencil
- Paper
- Craft snip or wire cutters
- Needle nose pliers
- Ruler
- Drill with 5/16" bit
AMACO® WireForm® and Fun Wire™; Forster® Dowel and Craft Disks; Design Master® Color Tool® Spray Paint; and Adhesive Technologies Professional I Glue Gun and Crafty Magic Melt® Glue Sticks are recommended products.
Instructions:
LEAVES: (Note: Before cutting leaves from Impression Mesh, cut off a 2" x 6" piece and set aside.) Trace and use craft snip to cut two leaves from the Impression Mesh according to pattern. Similarly, cut two leaves from the Designer’s Mesh and Sparkle Mesh.
- For center vein of leaf, cut a 6" length of Fun Wire™. With one leaf, insert Fun Wire™ through mesh at base of leaf allowing 1/2" to extend from base for stem. Insert wire back and forth along the center of mesh leaf at 1/4" to 1/2" intervals, bending and scrunching wire between intervals to add character. Bend end of wire over at point of leaf and trim if necessary.
- Cut a 24" length of wire. To encase the leaf edges, fold wire in half and carefully (so as not to pull out mesh strands) insert each end through mesh at point of leaf and twist wires together once to secure. Then, use wire to "sew" around both sides of leaf by inserting wire through mesh, wrapping wire around outside edge of leaf and reinserting through mesh at 1/4" to 1/2" intervals, ending at base of leaf. Twist ends of wires onto stem and trim stem to 1/4".
- For remaining veins, cut 3", 4" and 5" lengths of wire. Fold 3" length in half to find center, place wire under center vein 11/4" from point of leaf and cross wires over center vein to secure. Insert wire at an angle back and forth through mesh leaf at 1/4" to 1/2" intervals, bending and scrunching wire between intervals to add character. Bend end of wires over at edge of leaf and trim if necessary. Repeat using the 4" and 5" length, spacing approximately 11/4" apart.
- Repeat procedure to make five more leaves, but don’t trim the stem on one leaf.
CANDLE HOLDER:
- Drill a 5/16" hole in the center of two craft disks. Glue disks onto each end of dowel with rounded side of disks toward dowel. In well-ventilated area, spray candle holder with October Brown paint and let dry.
ATTACHING LEAVES:
- (Tip: To glue flower leaves to holder, use the lid of the spray paint as a working tool.) Set holder on top of lid (the flat edge setting on top of the lid will actually be the top of the candle holder). To make flower, attach a leaf (with trimmed stem) to rounded side of disk close to dowel using glue gun. Bend leaf down over paint can lid to shape. Similarly, attach four more leaves to disk, overlapping leaves approximately 1/2", and bend to shape. Remove candle holder from lid and set upright.
- With long-stemmed leaf, bend stem around base of dowel, bend to shape and tack glue leaf to craft disk.TENDRILS: Cut two 21" lengths of wire. Fold each in half, spiral wrap ends around pencil or dowel, remove and then bend and scrunch wire to add character. Twist folded centers together and glue to base. Bend and shape tendrils as desired.
TEA LIGHT HOLDER:
- Place the 2" x 6" piece of Impression Mesh (from step one) over edge of ruler and fold in half to form a 1" x 6" strip. Roll and glue strip into cylinder just slightly larger than tea light. Glue holder, with folded edge up, into center of flower. Place tea light candle into holder.

Read NextPumpkin Button Wall Art

