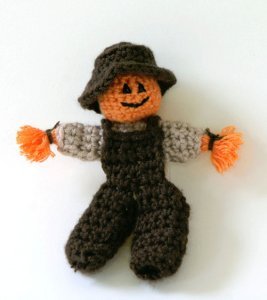
Crochet Scarecrow Finger Puppet
Make this crochet scarecrow finger puppet from Lion Brand Yarn to use with the kids! These are easy fall crafts that you can do quickly. Make one for every finger!

Materials:
- Microspun Yarn: Coffee one ball Note: (A)
- Microspun Yarn: Mocha one ball Note: (B)
- Microspun Yarn: Mango one ball Note: (C)
- Lion Brand Crochet Hook - Size G-6 (4.25 mm)
- Large-Eye Blunt Needles (Set of 6)
- Lion Brand Split Ring Stitch Markers
- Fiberfill stuffing
- Small amount of black embroidery floss
- 1 chenille stem
- Craft glue
- Sewing needle and thread
GAUGE:
Exact gauge is not essential to this project.
STITCH EXPLANATION:
sc2tog (sc decrease) Insert hook into st and draw up a loop. Insert hook into next st and draw up a loop. Yarn over, draw through all 3 loops on hook.
SCARECROW
LEGS
With A, ch 12, join with sl st in beg ch to form a ring.
Rnd 1: Ch 1, sc in each ch around, join with sl st to beg st.
Rnd 2: Ch 1, sc in each st around, join with sl st to beg st.
Rep last rnd 5 more times. Fasten off.
Make second leg the same, but do not fasten off.
Shape overall bib
Note: Opening is left at top of each leg for inserting fingers to make Scarecrow ‘walk’.
Next Row: Ch 1, sc in next 3 sts, sc into 3 sts along top of first leg – 6 sts.
Next Row: Ch 1, turn, sc in 6 bib sts only.
Rep last row twice more.
At end of last row, ch 10 (for strap), fasten off.
From right side, join A with sl st to beg of last row. Ch 10 for second strap, fasten off.
ARMS
With B, ch 6, join with sl st in beg ch to form a ring.
Rnd 1: Ch 1, sc in each ch around, join with sl st to beg st.
Rnd 2: Ch 1, sc in each of next 3 sts, 2 sc in next st, sc in each st to end, join with sl st to beg st.
Rnd 3: Ch 1, sc in each st around, join with sl st to beg st.
Rep Rnd 3 until piece measures about 2 1/2 in. (6.5 cm).
Next Rnd: Ch 1, sc in each of next 3 sts, sc2tog, sc to end of rnd, join with sl st to beg st.
Next Rnd: Rep Rnd 3.
Fasten off.
Wrap a strand of C around 2 fingers about 5 times. Slip off fingers, tie tightly with a strand of A. Clip loops at one end to form a tassel. Make one more tassel, then sew one to each end of Arms, tucking end inside B ‘sleeve’.
HEAD
With C, ch 10, join with sl st in beg ch to form a ring.
Rnd 1: Ch 1, sc in each ch around, join with sl st to beg st.
Rnd 2: Ch 1, work 2 sc in each st around, join with sl st to beg st.
Rnd 3: Ch 1, sc in each st around, join with sl st in beg st.
Rep last rnd once.
Next Rnd: Ch 1, * sc2tog, rep from * around, join with sl st to beg st – 10 sts.
Stuff head very lightly.
Next Rnd: Ch 1, * sc2tog, rep from * around, join with sl st to beg st – 5 sts.
Cut yarn, leaving a long tail. Weave tail through sts, gather together, fasten off.
HAT
With A ch 2, work 6 sc in first ch, join with sl st in beg st to form a ring.
Rnd 1: Ch 1, sc in each st around, join with sl st to beg st.
Rnds 2 and 3: Ch 1, *sc in next st, 2 sc in next st, rep from * around, join with sl st in beg st.
Rnds 4 and 5: Ch 1, sc in each st around, join with sl st to beg st.
Rnds 6 and 7: Ch 1, *sc in next st, 2 sc in next st, rep from * around, join with sl
Fasten off.
FINISHING
With floss, embroider straight st triangle eyes and smile.
Sew Head to center of Arms.
Fold chenille stem in half, insert folded end into back of Head, then through top of Legs. Sew stem in place. Wrap overall bib straps over ‘shoulders’ and sew in place.
Glue Hat to head.
Weave in ends.
Read NextRustic Ribbon Crochet Pumpkin Stack

