Amber Rose Bracelet
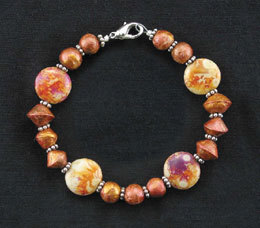
With colors of "Aztec Gold" and "Summer Russet," the homemade beads in this DIY bracelet from AMACO really shine. Making clay jewelry is easier than you might think. For a demonstration on how to use bead rollers, check out this video.

Materials:
- AMACO Craft Porcelain
- AMACO Needle Tool
- AMACO Professional Bead Baking Rack
- AMACO Tri-Bead Roller
- Ruler
- Gum Arabic
- USA Artquest, Inc. Pearl Ex Pigments — 661 Antique Copper, 654 Super Russet, 658 Aztec Gold
- Water
- Small Disposable Palettes (clean discarded jar or bottle lids work well)
- Craft Sticks or other Device for Mixing
- Applicators Such as Cotton-Tipped Applicators or
- Tsukineko Sponge Daubers
- 4 Focal Beads (FB) in Complimentary Colors (shown are approximately 12 mm Vintage Beads, ‘Puff Coin’ Shape)
- 18 — 4 mm Silver Heishi Spacer Beads
- 12" — 49 Strand Bead Stringing Wire From Beadalon®
- 2 Crimp Beads
- Bead Crimping Tool
- Wire Flush Cutters
- 13 mm Lobster-Style Clasp
Instructions:
-
Follow instructions provided with AMACO Tri-Bead Roller to measure clay size needed for each bead shape.
-
Roll measured clay sections in Tri-Bead Roller to form seven round beads and 6 bicone beads. Pierce each bead with AMACO® Needle Tool to create hole for stringing and string onto Bead Baking Rack pins for painting.
-
Working in small quantities as it dries fast, mix a small amount of gum arabic (approx. 1 teaspoon) and a little water in disposable palette. Stir in approximately 1 teaspoon Antique Copper pigment. Using applicator, sponge or dab on to each individual bead, spinning them around the wire/pin as you work to reach all sides. Don’t attempt to color it solid, you just want scattered patches of color here and there. Measurements are imprecise, experiment!
-
Repeat step 3 with the other two colors. If your color is too uniform you can go back and sponge on more of the other colors. By the third color, you want the entire bead covered with color. Pay attention to the areas by the holes too. Set aside to dry.
-
String a crimp bead 1/2" from end of a 12" length of beading wire; place wire end through loop on round bracelet clasp and back through crimp bead. Use crimping pliers to flatten crimp bead approximately 1/16" from loop, securing the bracelet clasp to wire.
-
String beads onto beading wire for this section of necklace in the following order separating each bead with a heishi spacer: 1 Heishi spacer, 2 rounds, 1 FB, 3 bicones, 1 FB, 3 rounds, 1 FB, 2 bicones, 1 FB, and 2 rounds. End with a heishi spacer and a crimp bead.
- Insert wire end back through crimp bead leaving a large enough loop to accept lobster claw, approximately 4 mm. Pull excess wire until crimp bead is desired length from end and flatten crimp bead with crimping tool. Trim excess wire with wire cutters.
Read NextMango Button Bracelet
Your Recently Viewed Projects
Weberme
Oct 22, 2016
Never heard of this bead roller or seen one used before I came across this tutorial. I like the way that there is a link to using this bead roller on this tutorial. This looks like a lot of fun and a great way to make some different colors by using the clay and gum arabic. Do I get that from a craft store? These beads are such a beautiful color. Great tutorial.
JessiCAN
May 02, 2011
@ Crafter 6577979: Thanks for catching this mistake! We have updated the project, and the gum arabic is now listed as a separate material. Thanks! -- FaveCrafts Editor
Teariana Designs
Apr 30, 2011
Just an FYI, After reading the instructions I realized that Gum Arabic is a separate item than the PearlEX pigments. I like that this is an air dry project, because I don't have a toaster oven or a kiln and my regular oven I don't think is real trustworthy for the lower temperatures some of the modeling compounds require. I think this project would also be great if you used regular pigments and then sponged on the pearl.
Crafter 5565116
Feb 21, 2011
Would be fun if happened to have all these supplies for beads. Whatever happened to rolling beads made from home made clay and just painting them with paint? Sorry, but this is not a cheap project to do with my after school program.
Report Inappropriate Comment
Are you sure you would like to report this comment? It will be flagged for our moderators to take action.
Thank you for taking the time to improve the content on our site.

