Bright Color Bangles
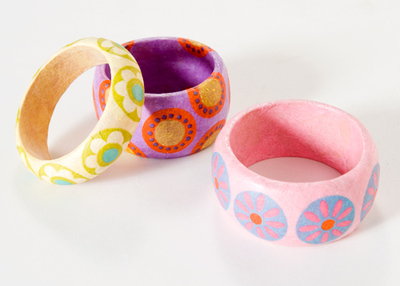
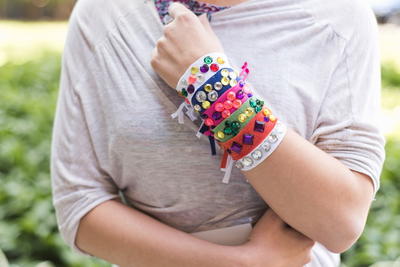
Use colored tissue papers, printed napkins and decoupage techniques to decorate plain bangles. Use tissue papers and napkins in bright spring colors and designs.

Materials:
- CS11305 - Mod Podge ® Matte, 4 oz.
- 3 wooden or plastic thick bracelets
- Pink tissue paper
- Yellow tissue paper
- Purple tissue paper
- Napkins
- Scissors
- Paint brush
Instructions:
- Cut out small square of each color. Glue each color to a seperate bracelet using the mod podge.
- Once the tissue papers have dried, remove the top layer of the napkin with the printed icons and begin to cut out. Glue on top of the tissue paper. Apply a top coat.
There are more great decoupage jewelry projects in our collection of 33 Fabulous Decoupage Ideas Plus 3 Helpful Tutorials. Don't miss out!
Read NextHow to Make a Macrame Bracelet
Your Recently Viewed Projects
quanahs 5032097
Mar 07, 2016
I love making decoupaged bangles. I have found great deals on plain wood bangles on eBay and Etsy. Michaels also carries a good selection. You can also recycle wood bangles you find at the thrift store, just sand them a bit and paint in your favorite color. I often use gift wrap as my source of design because there is such a wide range of colors and finding floral or other interesting prints is easy -- check the dollar store for great deals.
onecraftymomma4lif e
Feb 18, 2012
Azslp1842 ... this is alittle late , but i have found wood bangles , in diffrent shapes and sizes at Michelles craft store
azslp1842
Aug 27, 2011
I had to order the wooden bangles from DIYbangles com They don't have them at ANY major stores craft or otherwise in my area I tried this technique today and it took me a few minutes to get it right Using one large piece of tissue for a bracelet did not come out as smooth as it looks in the picture I tried white tissue paper as a background on one of them and it was totally lost in the wood I would have had to do a whole bunch of layers so instead I painted the wood white I also painted the wood white and used a patterned napkin as the base The pattern was black and white and in order to make the white parts look white and not take on a wooden-tone it needed to be white underneath The first two I did were so-so but the last…Read More couple I think will be cute when they dry Be prepared to play around a little at first I also added my own little touches like polka-dots around one of the designs
Report Inappropriate Comment
Are you sure you would like to report this comment? It will be flagged for our moderators to take action.
Thank you for taking the time to improve the content on our site.

