Chunky Beaded Bracelet
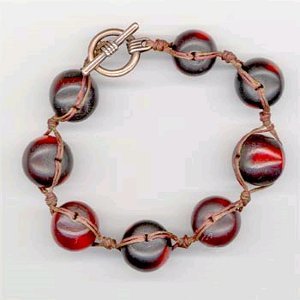
Make an elegant chunky beaded bracelet from The Bead Studio with this project and you'll be on your way to learning how to make jewelry. If you want to wear self made jewelry, this project is for you!

Materials:
- 8 14mm Resin Beads
- 2 1 yard pieces of Irish Waxed Linen (each yard should be a different color)
- Toggle Clasp
- Awl
- Scissors
- Clear Fingernail Polish


Instructions:
- Run both pieces of Irish waxed linen through the mounting hole of the toggle clasp. I prefer to start with the bar half of the toggle so I have the larger half of the toggle to work with at the end.

- Sink an overhand knot as close to the toggle as possible. An overhand knot is just like tying off a balloon. You can use an awl to help get the knot where you want it. Sink another overhand knot right next to the first knot. The two knots are to guarantee you have enough space to take the toggle clasp on and off easily.


- These resin beads have a large enough hole to run four pieces of waxed linen through them. The key it to run two pieces of linen into the bead from one side and feed the other two ends of thread through the opposite end.

- It's time to place another overhand knot. You want to get this knot to sit in the middle of the bead. Try to get equal distance from this knot to both holes of the bead.

- Repeat steps 3 and 4 until you have as many beads knotted up to complete the bracelet. A few things I want you to keep in mind. Irish waxed linen has a bit of a stretch so I need you to gently pull your bracelet to work that stretch out. If you don't pre-stretch this bracelet it will get slightly larger after you start wearing it.
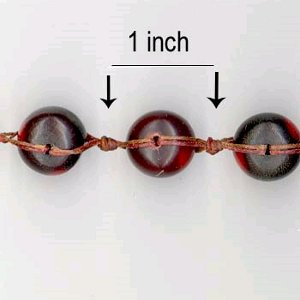
I also want you to know that with beads this size, after stretching the bracelet, you should have one inch between each knot. Use the one bead = one inch math formula to figure out how many beads you'll need for this project.
- Now its time to add the other half of the toggle. Run all four pieces of waxed linen through the mounting hole. Sink another overhand knot leaving as little space between the last bead and the toggle clasp.
Cut off the excess cord and use the clear fingernail polish on the last knot to help seal it up.

Read NextStunning Beaded Wrap Bracelet
Your Recently Viewed Projects
Report Inappropriate Comment
Are you sure you would like to report this comment? It will be flagged for our moderators to take action.
Thank you for taking the time to improve the content on our site.

