Look of Vintage Santa Card
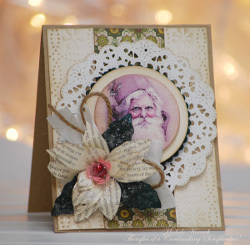
Save money and make a huge impression by making a Look of Vintage Santa Card from Michele Kovack. If you're searching for Christmas cards to make at home, this is a great project to try. Die cut and emboss cardstock to create a card that grandma would love.

Materials:
- E-Bosser
- Cuttlebug Embossing folder
- Spellbinder's scallop and circle dies
- Papertrey Ink Doily die
- Provo Craft's Poinsettia die
- Cardstock: Papertrey Ink (cream, green, kraft, pink)
- Designer paper: Stampin Up! (book paper) Crafty Secrets (green designer paper)
- Seam Binding: Schiff
- Twine: Michaels
- Ink: Memento
- Glitter: Martha Stewart
- Pearls: Martha Stewart
- Santa image: Crafty Secret's Christmas Digital CD
Instructions:
-
Emboss background using cream cardstock and Cuttlebug embossing folder.
-
Ink edges. Adhere to kraft card.
-
Cut strip of designer paper and adhere to center of card vertically.
-
Use Papertrey Ink doily die with white cardstock and run through E-bosser. Ink edges.
-
Adhere to center of card using dimensional foam circles.
-
Use Spellbinder's scalloped die with green paper. Run through E-bosser.
-
Adhere to center of doily suing dimensional foam circles.
-
Use Spellbinder's circle die and cream cardstock. Run through E-bosser.
-
Ink edges and adhere to scalloped circle using dimensional foam circles.
-
Run Crafty Secret's image through E-bosser and a Spellbinder's circle die.
-
Adhere to card using dimensional foam circles.
-
Use Provo Craft's poinsettia die, green and pink cardstock, book paper and run through E-bosser.
-
Assemble flower. Spray with adhesive and sprinkle with glitter. Add pearls to center.
-
Tie seam binding and twine into a bow.
- Glue bow and poinsettia to card.
Read NextLittle Toy Soldier Card

