Ruffled Angel Statue
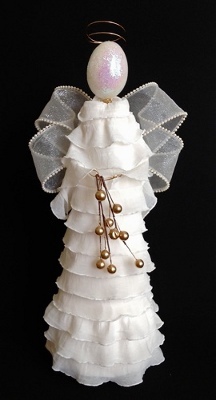
This ruffled angel statue from Gloria Uhler is a simple angel craft to do for Christmas or to decorate your home all year round. Ruffled fabric and foam makes this project simple and quick to create. Grab these angel patterns and get to work.

Materials:
- Wire cutters
- Flat nose pliers
- Gold wire
- 4 nail head wires
- 4 pearls
- Styrofoam egg
- Holiday stems
- 2” wide pearl edge ribbon
- 12” Styrofoam cone
- 16” square of fleece or felt
- Glue gun
- Sewing notions
- 6” X 45” of ivory, stretchy, ruffled fabric
- Template
 Instructions:
Download and print out the body template. Use it to cut out a piece of fleece or felt. You may notice the shape of the fleece is slightly wider than the width of the cone at the bottom. This is deliberate and adds a little more fullness to the angel shape.
The Body
- Cut four strips of ruffles. A strip includes three ruffles plus the margin above the first ruffle. Two strips should measure 13” in length, one should measure 12”, and one 15”. Attach little pieces of painters tape to one end of the strips with the marked measurement on it so you can tell them apart later.
- With a basting stitch, gather the ruffles starting at 3.25” in from the end and ending at 3.25” from the other end. The purpose of gathering the strips is to ease fabric to fit the curve of the fleece.
- Sew a 13” ruffle strip at the top of the fleece with the edge of the margin matching the curve of the neck. Adjust the gathering to allow 3.25” non-gathered tails on each end.
- Sew the next 13” strip onto the fleece with the bottom edge of the previous ruffle completely overlapping the margin of the new strip. The tails on each side should measure 2.25”.
- The next strip to attach is the 12”. The last will be the 15”. These two strips do not have tails. The end of the strip should match the edge of the fleece. Trim if necessary.
- Cut one more strip of only one ruffle plus the margin, to measure 13” long. Gather it as you did the other ruffles. Attach it to the neck sewing the margin to the wrong side of the fleece. The ruffle creates a collar at the neck when flipped to the right side.
- Connect the lower back seam by moving the ruffles aside and overlapping the bottom 3” of fleece. Hot glue together.

The Head & Neck
- I used a remnant from an Easter egg wreath project for the angel head. It had the wire attached to the egg shape. You can create a head with a painted styrofoam egg and glue wire into it, or use a painted wooden egg. Ball Christmas ornaments are another good option for an angel head.
- Wrap a piece of gold wire around a slim pencil 5 times. Slip it off and cut off the ends.
- Slide the coiled wire onto the wire stem connected to the head. Coat the stem with a light layer of glue and push it into the center of the cone.

The Wings
- Glue the edge of the ribbon to the right vertical center back of the cone. Use straight pins to hold the ribbon in place while gluing.
- With the front of the cone facing you, twist the ribbon away from you creating one loop. Twist it again creating another loop.
- Attach the ribbon to the center back under the first piece of ribbon and glue in place. Create the right wing in the same way.
- Create a third wing down the center back. Instead of gluing the ribbon ends, secure them with a nail head wire inserted into a pearl. Coat the wire with hot glue before attaching to the cone.

Finishing The Body
- Slip the fleece onto the cone. Bend the wings out of the way and hot glue the fleece back seam edges to the cone.
- Bring the remainder of the back seam together and glue to close the rest of the seam. Don’t glue down the ruffles to the seam or fleece.
- When the seam is secure, overlap the ruffle edges and dot with glue to hold them together.
- Loosely wrap the tails of the collar round the neck and push them down between the fleece and the styrofoam at the front. Hot glue the center front of fleece to the styrofoam at the neck. Return the wings to their original position and reshape them as necessary.

The Arms
- For each arm, cut a 10” piece of gold wire. Fold it in half. Holding half an inch from the fold with flat pliers, twist the length of wire to join the two pieces.
- Lift the ruffles out of the way before attaching the arms. Coat the ends of the arm wires with hot glue and poke them into the side of the angel body. You may need to first pierce the fabric with a sharp object to create a path for the wire.
- Bend the arms at angles so the hands meet. Thread holiday stems into the hand loops and bend the stem ends to hold the hands together.

The Halo
- Since the wire comes coiled, there’s little to do to create the halo but cut a piece that includes at least two circles.
- Bend an angle in both wire ends and smooth them out so they’re straight. One should have a long stem, the other, a tail only long enough to make a small loop and attach it to the circle.
- Coat the long stem of the wire with hot glue and push it into the Styrofoam behind the center back of the head.

Read NextRusty Bedspring Angel
Your Recently Viewed Projects
SissieSass
Jan 27, 2017
I love how beautiful this little angel is to look at. I can see making so many of these and giving them away. My mom loves angels and she collects them, but I do not think that she has any angel that looks like this one. Thanks for posting it.
Report Inappropriate Comment
Are you sure you would like to report this comment? It will be flagged for our moderators to take action.
Thank you for taking the time to improve the content on our site.

