Jaunty Snowman Ornapendant
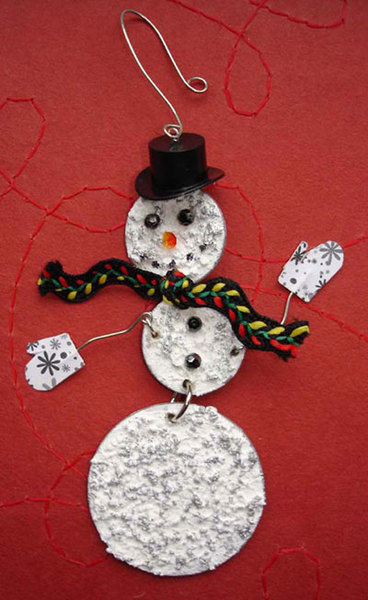
This jaunty little snowman, featuring Snow-Tex, makes a delightful addition to any tree or a festive holiday pendant.

Materials:
DecoArt Products Required
Snow-Tex
- DAS9 - Snow-Tex
Dazzling Metallics
- DAO70 - Shimmering Silver
Palette Knife
- DT02 - Palette Knife
Glamour Dust
- DAS37 - Glamour Dust Crystal
Other Supplies:
- Flat brush
- Small foam pouncer
- Fine point black marker
- Eye pin
- Patterned scrapbook paper in coordinating color
- Plastic top hat charm, Sacred Kitsch Studios
- Four 4-mm jet ab CRYSTALLIZED Swarovski Elements rounds
- 4-mm fire opal CRYSTALLIZED Swarovski Elements bicone
- 20-gauge silver-plated craft wire
- Three 10-mm heavy duty white jump rings
- Two 5-mm silver-plated jump rings
- Patterned ric rac ribbon
- Uni-Ball Signo white pen
- Amazing Gloop
- Scrapbook adhesives
- Double-sided tape
- Two pair chain nose pliers
- Round nose pliers
- Wire cutters
- Electric drill with 1/16" bit
- Sharp scissors
- Two 1" chipboard circles, Bazill Basics
- 1 7/8" chipboard circle, Bazill Basics
Instructions:
-
Use palette knife to spread thick layer of Snow-Tex on each chipboard circle. Sprinkle small amount of Glamour Dust on surface. Allow to dry overnight.
-
Use flat brush and Shimmering Silver to edge each circle and to paint back of each circle. Use foam pouncer to lightly spread small amount of Shimmering Silver across raised portions of circle surfaces. Allow to dry.
-
Mark hole placement and then use drill with 1/16" bit to create hole at top of largest circle; at top, sides, and bottom of one smaller circle; and at top and bottom of second smaller circle. Use white pen to fix any areas that may have lost Snow-Tex.
-
Make gentle indentations with brush end for eyes and nose on head circle. Glue them in place using Amazing Gloop and allow to dry.
-
While drying, use black marker to add small dots for mouth. Repeat process for buttons on mid-section circle.
-
Use wire to make small stick arms. Bend with fingers to give sticks some movement. Use round nose pliers to create small loops in one end of each stick arm.
-
Drill hole in center top of top hat using 1/16' drill bit. Thread with eye pin; bend pin flush to top of hat and cut to about 1/8". Use round nose pliers to grasp and roll end into loop.
-
Create hook using 20-gauge wire by cutting off 3" section of wire and making small loop in each end with round nose pliers. Bend center of wire over index finger and use fingers to shape wire into hook.
-
Attach sections together using jump rings: attach arms using smaller jump rings; attach hat to top of top jump ring. Attach hook to top of hat.
-
Tie 3" section of ribbon around front of jump ring that attaches head to body. Use fingers to fray edges slightly.
-
Trace mittens onto scrapbook paper and cut out. Place each cut out mitten on back of paper to trace mirror image mitten. Apply double-sided tape to back of one mitten in each set.
-
Compress mittens over end of craft wire. Clean up any overlap with scissors.
- Hang on tree or replace hook with swivel lobster clasp and wear on chain.
Helpful Hint:
- If you want to wear as a pendant, make sure you seal circle backs so they are water resistant.
Read NextSimple Sock Snowman Tutorial

