Santa Suit & Hat for Baby
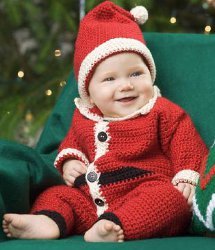
Say it with me now, "Awwww!" This free crochet pattern is absolutely adorable. Make this Santa Suit & Hat for Baby for the little ones in your life who are celebrating their first Christmas. This baby outfit would make for an adorable Christmas card, and it's a cute and festive way to dress your little one up for Christmas morning. Great for all levels of crochet fans, this cute crocheted baby outfit can be made during the course of a snowy weekend spent indoors.
Materials:
- 2 (2, 3, 3) balls Red Heart “Soft Yarn” in Really Red (A)
- 1 ball Red Heart “Soft Yarn” in Black (B)
- 1 ball Red Heart “Soft Yarn” in Off White (C)
- 5.5mm [US I-9] crochet hook
- Yarn needle
- Sewing needle and thread
- Seven 5/8” black buttons
- Pattern
Instructions:
Left Leg-Cuff
-
With B, ch 15 (15, 17, 17).
-
Row 1 (Right Side): Sc in 2nd ch from hook and in each ch across; turn – 14 (14, 16, 16) sc.
-
Rows 2 and 3: * Ch 1, inc in first sc, sc in each sc to last sc, inc in last sc; turn – 18 (18, 20, 20) sc at end of Row 3.
-
Sizes Small and Medium Only-Row 4: Repeat Row 2 changing to A in last sc – 20 sc. Cut B.
-
Sizes Large and Extra Large Only-Row 4: Ch 1, sc in each sc across changing to A in last sc; turn. Cut B.
-
All Sizes-Next Row: Ch 1, sc in each sc to last sc, inc in last sc; turn – 21 sc.
- Repeat last row 15 (17, 19, 21) more times – 36 (38, 40, 42) sc. Fasten off.
Right Leg
- Work the same as for the Left Leg except do not fasten off.
Join Legs for Body
-
Continuing on Right Leg, ch 1, sc in each sc across, ch 3, with right side facing, sc in each sc across Left Leg; turn.
-
Next Row: Ch 1, sc in each sc and each ch across; turn – 75 (79, 83, 87) sc.
- Work even in sc for 11 (12, 13, 14) more rows changing to B in last sc of last row. For Belt with B work 4 rows even in sc changing to A in last sc of last row. With A work 13 (14, 15, 16) more rows even end by working a wrong side row.
Divide for Fronts and Back
Right Front
-
Ch 1, sc in first 16 (17, 18, 19) sc; turn. Work even in sc on these sts for 15 (17, 19, 21) more rows. Fasten off.
-
Shape Neck: Skip first 8 (8, 9, 9) sc, join A in next sc; ch 1, sc in same sc and in each sc across; turn.
- Next Row: Ch 1, sc in 6 (6, 7, 7) sc, dec. Fasten off.
Back
- With right side facing, skip next 4 sc of last long row; join A in next sc; ch 1, sc in same sc and in next 34 (36, 38, 40) sc; turn – 35 (37, 39, 41) sc. Work even in sc on these sts for 17 (19, 21, 23) more rows. Fasten off.
Left Front
-
With right side facing skip next 4 sc of last long row; join A in next sc; ch 1, sc in same sc and in each sc to end; turn – 16 (17, 18, 19) sc. Work even in sc for 15 (17, 19, 21) more rows.
-
Shape Neck: Ch 1, sc in first 8 (8, 9, 9) sc; turn.
- Next Row: Ch 1, dec, sc in last 6 (6, 7, 7) sc. Fasten off.
Assembly
- Sew shoulder seams across 8 (8, 9, 9) sts. Sew inseam of Legs, leaving the 3 sc of crotch free.
Front Bands
-
Row 1: With right side facing, join C at corner of Left Front; ch 1, work sc evenly down Left Front, across the 3 sts at crotch and up the Right Front; turn.
-
Row 2: Mark positions for 7 evenly-spaced buttonholes. Ch 1, sc in each sc to marker working dec at each inside corner at crotch, [ch 3, skip 2 sc, sc to next marker] 6 times, ch 3, skip 2 sc, sc in each sc to end; turn.
- Row 3: Ch 1, [sc in each sc to ch-3 space, 2 sc in ch-3 space] 7 times, sc in each sc to top of Right Front dec as before at crotch to keep work flat; do not turn, but pivot to work collar.
Collar
-
Row 1: Ch 1, work sc evenly across neck edge and across bands; turn.
- Rows 2-5: Ch 1, sc in each sc across; turn. Fasten off.
Sleeves
-
Round 1: With right side facing, join A at center of armhole; ch 1, work 35 (39, 43, 47) sc evenly spaced around armhole; join with a slip st to first sc; turn.
-
Round 2: Ch 1, dec at each end of round; join; turn – 33 (37, 41, 45) sc.
-
Repeat last round 1 (2, 2, 3) times more – 31 (35, 37, 39) sc.
-
Next Decrease Round: Ch 1, dec at each end of round; join; turn
-
Next 2 Rounds: Ch 1, sc in each sc around; join; turn.
-
Sizes Small and Medium Only: Repeat last 3 rounds until 19 sc remain changing to C in last sc of last round. Cut A. Work 2 rounds even. Repeat Decrease Round – 17 sc.
-
Work 1 round even. Fasten off.
- Sizes Large and Extra Large Only: Repeat last 3 rounds until 21 sc remain. Work 1 round even changing to C in last sc. Cut A. Work 1 round even. Repeat Decrease Round – 19 sc. Work 2 rounds even. Fasten off.
Finishing
- Weave in ends. Sew on buttons opposite buttonholes.
Hat
-
Round 1: With A, ch 2; 3 sc in 2nd ch from hook; join with a slip st to first sc.
-
Round 2: Ch 1, [inc] 3 times; join – 6 sc.
-
Round 3: Ch 1, [sc in next sc, inc] 3 times; join – 9 sc.
-
Round 4: Ch 1, [sc in next 2 sc, inc] 3 times; join – 12 sc.
-
Round 5: Ch 1, [sc in next 3 sc, inc] 3 times; join – 15 sc.
-
Round 6: Ch 1, [sc in next 4 sc, inc] 3 times; join – 18 sc.
-
Rounds 7-17 (7-18, 7-19, 7-20): Continue in this manner, increasing 3 sc every round and working one more sc between increases until there are 51 (54, 57, 60) sc.
-
Rounds 18-26 (19-30, 20-34, 21-38): Ch 1, sc in each sc around; join. Change to C in last sc of last round. Cut A.
- With C, work 5 rounds even in sc. Fasten off.
Ball Adornment
-
Round 1: With C, ch 2; 3 sc in 2nd ch from hook; join with a slip st to first sc.
-
Round 2: Ch 1, [inc] 3 times; join – 6 sc.
-
Round 3: Ch 1, [inc] 6 times; join – 12 sc.
-
Round 4: Ch 1, sc in each sc around; join.
-
Round 5: Ch 1, [dec] 6 times; join – 6 sc. Stuff ball with extra C yarn to make it puffy.
-
Round 6: Ch 1, [dec] 3 times; join – 3 sc. Fasten off.
- Attach Ball Adornment to tip of hat. Weave in ends.
Your Recently Viewed Projects
brendajane
Dec 13, 2010
The Baby Santa Outfit is so darlin. I am hoping I can start and make a lot of them for couples who need them for their little 2 legged darlins. Red Heart yarns are fantastic. Thank you. I can only ask for ya al to come up with a Pet Santa Coat or Pet Jacket for our 4 legged friends. I have looked everywhere for one to crochet. It is not to late to put one on the website. If Red Heart would do The Pet Santa Coat or Pet Jacket to match the Baby Santa Outfit then the babies and the pets would have matching Outfits to have their pictures taken with. That would be all too cute.
Report Inappropriate Comment
Are you sure you would like to report this comment? It will be flagged for our moderators to take action.
Thank you for taking the time to improve the content on our site.

