This project was submitted by one of our readers, just like you.
Recycled Handbag Picnic Caddy
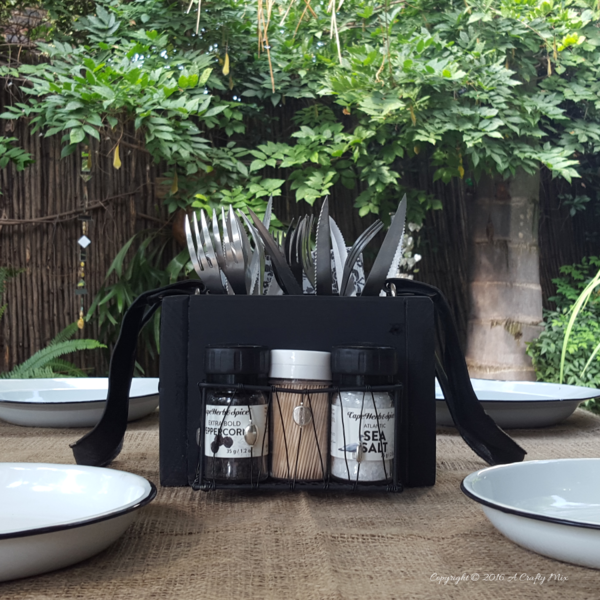
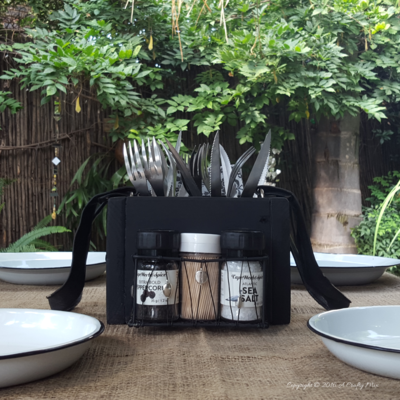
Put an old, broken handbag to good use this summer by turning it into a picnic caddy. The Recycled Handbag Picnic Caddy combines pieces of a handbag, a wire rack, some tin cans, and more to create an organized place to store silverware, condiments, and other supplies for your next picnic. These recycled project ideas have many compartments on the outside and inside to keep you from losing things. Paint all of the elements of your DIY picnic caddy the same color to make it look like new!
Estimated CostUnder $10
Time to CompleteIn an evening
MaterialsPaint, Recycled Materials
Primary TechniqueDIY Craft

SeasonSummer
Project TypeMake a Project
Materials List
- Old handbag
- pallet off cuts
- empty tins
- wire basket (optional)
- spray paint
- Wood glues and screws
Instructions
-
Cut the pallet off cuts into two pieces measuring 16cm x 14cm and two pieces measuring 19cm x 14cm. The pieces were glued and screwed together to form a box. We also added two bits of wood to the bottom of the box so that the cutlery wouldn’t fall out and sprayed the box black.
-
We used galvanized fencing staples to attach the handbag handles and we drilled four small holes on the side of the box and hammered in the wire baskets, one on each side.
-
Put the tin cans inside to hold your cutlery and it's ready to be used.
Why You'll Love This Recycled Craft
Top 3 Reasons to Make the Recycled Handbag Picnic Caddy:
1. Eco-Friendly: By repurposing an old, broken handbag and tin cans, you are giving new life to items that would otherwise have been thrown away. This craft project is a great way to reduce waste and contribute to a more sustainable lifestyle.
2. Practical and Organized: The Recycled Handbag Picnic Caddy offers multiple compartments both on the inside and outside of the caddy, providing a convenient and organized way to store silverware, condiments, and other picnic supplies. Say goodbye to rummaging through a messy picnic bag - everything has its own place in this caddy!
3. Budget-Friendly and Customizable: This DIY project is a budget-friendly option for creating a picnic caddy, especially if you already have the materials on hand. Additionally, you can customize the caddy by painting all the elements the same color to give it a fresh and new look that matches your personal style. Stand out at your next picnic with a one-of-a-kind, upcycled picnic caddy!
Read NextDenim Pocket Purse
Your Recently Viewed Projects
Marilyn B
Jun 06, 2017
This repurposed and up cycled project is a dandy! You could also opt to visit the dollar store for some plastic containers of all sizes to use in this project if you don't have the can sizes you need, or to make it a bit lighter with plastic vs metal if you wish. You could also make this into a sewing or craft caddy so you can create projects when you travel! Great inspiration and idea!
Report Inappropriate Comment
Are you sure you would like to report this comment? It will be flagged for our moderators to take action.
Thank you for taking the time to improve the content on our site.


