Faux Stained Glass
If a stained glass window is out of your budget or difficult to find, create your own "stained glass" with Tilano's Image Transfer Kit. This computer craft project is a clever way to get the appearance of stained glass at a fraction of the price!


Materials:
- Glass of any size and thickness- If you go to a glass shop they may have scrap pieces for free. I used an 11x14 piece of glass from an old picture frame. Thrift stores are also a great place to look for pieces of glass.
- Tilano’s Image Transfer Kit ($29.99)
- Glass mounting hardware to hang glass (see diagram at bottom)- optional
- Wire- if you are going to hang your glass artwork
- A computer to create stained glass ‘image’. You can also find stained glass patterns online.
Instructions:
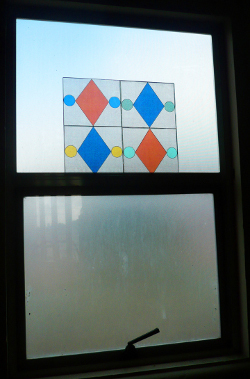
- In Word (or a paint/editing program) create a stained glass look. I inserted shapes, and used rectangle boxes. I filled in each rectangle to be a different color and added a thick black border to each box. You can really create any stained glass look that you like and in any shape. Here is my image printed on Tilano's imaging paper.

- Print out your image onto the Tilano Imaging Paper and then follow the kit instructions. Apply the medium to the surface. I applied 2 coats to my image.

- Coat your glass with medium using long, smooth brush strokes. I applied 2 coats to the glass.

- When you peel off the paper backing, peel slowly. After the paper backing is off, apply 2-3 coats of medium to seal, with long brush strokes.

- If you would like to hang your glass, I would suggest going to a building depot and purchase 4 glass clamps like the one shown below. You can purchase any style but it is important that the clamps have rubber on each side of the glass so the clamps do not crack the glass. Once you tighten them onto your glass (not too tight- just snug) wrap wire around the end of each screw to create a wire hanger. You can also hang your glass by putting it back into the picture frame you used.

- Here's the finished project:

Read NextUpcycled Thread Spool Garland
Your Recently Viewed Projects
wizardelf 1207863
Dec 17, 2010
No source given for Tilano Kit - nice project - for the beginner
Jlyon6
Dec 16, 2010
Did you miss a step between #3 & #4? I'm assuming that you apply the imaging paper to the glass? But do you do it while the medium on the glass & the paper is still wet, or does it get tacky, or what? And when do you peel the paper off? While it's still wet, or do you let it dry?
Char55
Apr 27, 2010
Taking Dragonond2002's comment above one step further...you can make your own rub-on transfers using the clear printer pages. Just print the image onto the sheet let it dry transfer it to the glass using a popsicle stick. See complete instructions on this link httpwww.ehow.comhow2325965own-rubons.html
Dragonod2002
Apr 27, 2010
Why not just skip the entire process of trandfer medium and stuff and instead buy the printable clear projector pages. I think they have them still at Staples or Office Max. Then glue or tape the piece to the window. You could even buy colored tape and use that. Take a glue gun and carefully glue the page to the window, and use the tape to make it look like it's framed in. Also, you won't be forced to have a frosted glass piece. Notice how every window is frosted? It can be clear!
Report Inappropriate Comment
Are you sure you would like to report this comment? It will be flagged for our moderators to take action.
Thank you for taking the time to improve the content on our site.

