Dancing Color Easter Eggs
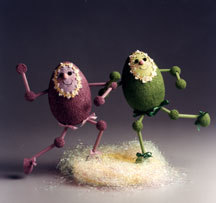
Two colorful Easter eggs two-step onto the Easter scene. All you need to get these dashing eggs into your home is some STYROFOAM Brand Foam, satin ribbon and pom-poms. It's quick and easy Easter favorite.

Materials:
- STYROFOAM Brand Products:
- 2 -6" Eggs
- 12 -1" Balls
- 2 -1 1/2" Balls
- 1 -8" Disc
- 2- 5/16" Wooden dowel, 36" lengths
- 1 yd. each of violet and light green 3/8" satin ribbon
- 1- 3/4 yd. 1/2" flower trim
- 4- 1/4" black buttons, half-round
- 2- 3/8" pom poms, pink
- Acrylic craft paint: violet, light green, yellow, pink, black, white
- Nylon stocking, scrap
- Paint brushes: large, medium, very small
- Low temperature glue gun and glue sticks
- Easter grass (optional)
- Toothpicks
- Rubber band
- Serrated knife
- Coping saw
- Fine sandpaper
- Decoupage glue
Steps:
- Prepare face: Cut ovals from nylon stocking. Cover face area on 6" eggs with decoupage glue. Carefully press stocking fabric onto glue, gently stretching to remove any wrinkles. Liberally apply decoupage glue over stocking. Let dry.
- Saw dowels into pieces and sand edges smooth:
a. Four 2 1/2" lengths (upper arms)
b. Four 2 1/4" lengths (lower arms)
c. Four 2" lengths (upper legs)
d. Four 3 1/2" lengths (lower legs)
e. Two 1 1/4" lengths (for attaching feet to base)
- Using serrated knife, cut in half the two 1 1/2" balls to make feet. (Hint: For smoother cuts, wax the blade with an old candle.) For hands, cut a small slice from four of the 1" balls.
- Paint all of the pieces for each figure one color (each figure will have one 6" egg, four 1" balls, two feet, two hands and leg and arm dowel pieces). For easier handling, insert a toothpick in each of the small balls and use as a handle; insert toothpicks into foam scrap to dry. Hold 6" egg steady by placing one end in a cup or tin can while painting. Insert dowel pieces into foam scrap while drying. Let dry.
- Mix a small amount of white paint into body paint to create pastel color for face. Paint the face area, covering the stocking.
- Paint the disc yellow; this will serve as the base.
- Glue black button eyes and pom pom noses to faces. Paint on mouth, eyelashes and eyebrows using black paint and tiny brush. Blush cheeks, using dry brush. Glue flower trim around each face.
- Assemble bodies, working on both figures simultaneously so you can arrange arms and legs to compliment each other; refer to photo as you go. Assemble first without gluing, so you can adjust angles as you work. Poke holes in foam shapes with a sharp pencil so dowels will slip in more easily. Assemble:
a. Place a rubber band around 6" egg, dividing front and back in half.
b. Push dowels for upper arms and upper legs into the egg along this line. Locate upper arms at about chin level and upper legs at the very bottom of the egg, placed a little further apart than the eyes.
c. Push 1" balls (elbows and knees) onto the ends of each dowel with a gentle twisting motion. Don't push the dowels more than half-way into each ball.
d. Attach lower leg dowels to each knee and toward the back of each foot. The outer legs should angle out and the inner legs bend slightly (refer to photo).
e. Attach lower arm dowels to elbows and hands. The outer arms point upward on one egg and downward on other egg. Inner arms should angle around each other as eggs lock arms. (Use photo as guide.)
f. When figures are positioned to your satisfaction, glue together.
g. Glue short dowel pieces half-way into the center bottom of each inner foot. Glue dowel firmly into centerline of base.
- Tie ribbon into small bows and glue to the tops of legs and shoes.
- Cover base with Easter grass (optional).
®™ Trademark of The Dow Chemical Company ("Dow") or an affiliated company of Dow. For more project ideas, please see styrofoamstyle.com.

