Easter Egg Birdhouse
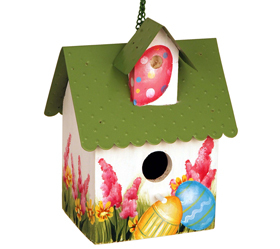
This pre-assembled birdhouse makes a fun and easy project for Easter home decorating. Colorful Easter eggs make this birdhouse really stand out. Put it outdoors as a real home for feathered friends or keep it indoors as a cute centerpiece.

Materials:
-
Delta Creative Ceramcoat® Acrylic Paint:
- Terra Cotta 2071
- White 2505
- Sunbright Yellow 2064
- Light Foliage Green 2537
- Pine Green 2526
- Tahiti Blue 2650
- Royal Fuchsia 2510
- Apple Green 2065
- Crocus Yellow 2459
- Pop Pink 2646
- Delta Creative Ceramcoat® Satin Exterior/Interior Varnish 7003
- Delta Creative Ceramcoat® All-Purpose Sealer 5401
- Birdhouse Tin Roof Provo Craft (Michaels)
- Brushes
- Loew-Cornell La Cornellie
- Shader Series 7300 Size #6 and 12
- Wash Series 7550 1”
- Brush Tub
- Loew-Cornell Graphite transfer paper black
- Loew-Cornell Palette Paper
- Tracing paper
- Stylus
- Paper towel
- Scissors
- old fluffy brush for stippling
- Pattern
Instructions:
Wood Preparation:
-
Always sand with the grain of the wood.
-
Using fine grit sandpaper sand off burrs and rough edges from both pieces, use tack cloth to remove dust.
- Apply one even coat of All-Purpose Sealer using 1” wash brush to both pieces. Allow to dry thoroughly. Sand with fine grit sandpaper (250-300 grit). Remove dust with tack cloth.
Painting Instructions:
-
Basecoat in White using the 1” wash brush.
-
Using the 1” wash brush start at the bottom of the house and pull up flicking in the grass in Light Foliage Green allowing it to fray at the top.
- Using the #1 liner streak with a little Apple Green here and there.
Transferring Pattern:
-
Lay tracing paper over pattern and trace all lines except those used to denote shadows. The shadow lines are generally short straight lines and several of them. Main lines are where there are color changes. Detail lines are facial features, patterns on fabric, and etc. Lay tracing on surface and tape at top and on one side. Slide graphite paper between tracing and surface with the dark side down; draw over the main lines only. Do not add the detail lines these will be applied after the basecoating is done.
- Apply pattern.
Pink Flowers:
-
Stipple the pink flowers in Pop Pink tipped in White keeping the White to the top of the flower.
-
Using the #6 shader lightly float at the bottom of each flower in Royal Fuchsia.
- Using the #1 liner stroke the leaves and the stems in Pine Green.
Yellow flowers:
-
Using the #1 liner stroke the small petals in Crocus Yellow. Dab the centers of the flowers in White plus a touch of Crocus Yellow.
-
Pull small shadow lines on each petal from the center out using the #1 liner in Terra Cotta.
- Do the stems in Light Foliage Green plus a touch of Pine Green using the #1 liner.
Pink Egg:
-
Basecoat Pop Pink plus a touch of White using the #12 shader.
-
Using the #1 liner create the dots in White, Tahiti Blue plus a touch of White and Crocus Yellow.
- Float the shadows lightly around the outside edge with Royal Fuchsia using the #12 shader.
Blue Egg:
-
Basecoat in mix of equal parts White and Tahiti Blue.
-
Do the rick-rack stripe in White using the #6 shader.
-
Do the narrow stripe in Apple Green using the #1 liner.
- Float the shadows around the outside edge with Tahiti Blue using the #12 shader.
Yellow Egg:
-
Basecoat mix of equal parts Crocus Yellow and White.
-
Do striped band in Light Foliage Green and then in White using the #1 liner.
-
Float the shadows with lightly with Terra Cotta using the #12 shader.
- Float a highlight on each egg at the top in White.
To Finish:
- Apply as many coats of Satin Exterior /Interior Varnish as desired using the 1” wash brush.

