Jewel Framed Easter Bunny Card
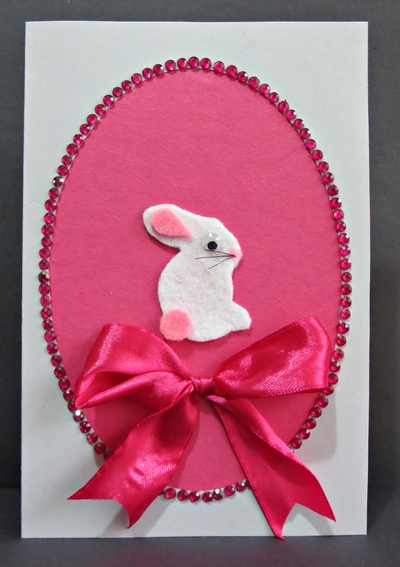
Make an Easter card with a bunny as the focus point and spread some Easter cheer to your family, neighbors, and co-workers. This sweet Jewel-Framed Easter Bunny Card is a quick craft that is simple to do, and the bow beneath the bunny ensures that this friendly fella won't go unnoticed by anyone.
Estimated CostUnder $10
Time to CompleteUnder an hour
Primary TechniqueGeneral Paper Crafting
Project or Page SizeCard
Type of Paper UsedCardstock

SeasonEaster
Materials List
- 10" x 7.3" gray cardstock
- 7.3" x 5" dark pink sugar paper
- 7.3" x 5" light pink cardstock
- White felt
- Light pink felt
- Small cerise pink flat back crystal beads, enough to outline the oval on the front of the card
- 1" wide cerise pink satin ribbon
- One 8mm wiggle eye (or two, depending on the type of cookie cutter used)
- Three short black bristles cut from a broom
- 2" high bunny cookie cutter
- 4" x 5.7" lid of oval cookie tin
- Pink felt tip pen
- Pencil
- Standard scissors
- Quick drying glue (such as Bostik Clear)
Instructions
-
Score the 10" x 7.3" gray cardstock in half to create a card sized 5 x 7.3.
-
With the fold at the left, position the lid onto the front of the card and trace all around it. Cut the oval shape out.
-
Glue the dark pink sugar paper behind the front flap of the card to the inside of the card.
-
Glue the light pink cardstock behind the sugar paper to the inside of the card.
-
Glue crystal beads all around the oval shape on the front of the card.
-
Use the bunny-shaped cookie cutter to trace a bunny onto the white felt and cut it out.
-
Cut a small circle and small teardrop from the pink felt. Glue the pink teardrop onto the bunnys ear and the pink circle onto the bunnys tail.
-
Make a small nose with the pink felt-tip pen.
-
Add the whiskers and wiggle eye.
-
Glue the bunny to the front of the card.
-
Make a bow with the satin ribbon and neatly cut the ends shorter.
-
Glue the bow beneath the bunny.
Read NextEaster Egg Pom Pom Craft

