This project was submitted by one of our readers, just like you.
Felt Gnome Ornament
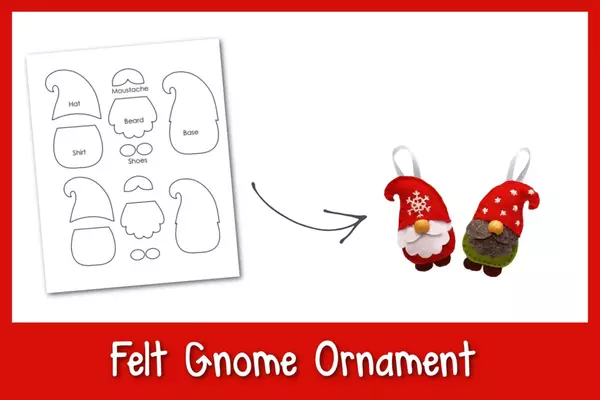
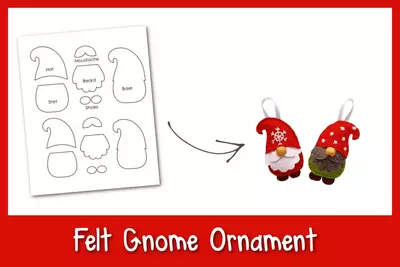
"Create a lasting craft that your kids will be proud of for years to come with this adorable Felt Gnome Ornament. A craft and a keepsake, your kids will love decorating the tree with this ornament. They get an afternoon of family time while it is cold outside, and you get an afternoon of busy hands and warm hearts around the table. Gather your kids together and create a keepsake and gifts for family and friends. "
Primary TechniqueFabric Crafts

Materials List
- Felt fabrics
- Cotton or scrap felt pieces
- Wooden bead
- Needle
- Thread
- Fabric glue
- Pencil
- Fabric scissors
Instructions
-
Start by selecting the felt fabrics for the gnome ornament. For this tutorial, I picked out a white piece, a dark brown piece, a tan piece, and a red piece. Once you have selected your felt pieces, trace the template patterns onto them. The template includes a gnome base layout, hat, shirt, shoes, beard, and mustache.
-
Let’s start by stitching the snowflake pattern on the hat cutout. Start by placing your knot on the underside of the center of the snowflake. From there, stitch the 6 arms off from the center.
-
Join every 2 center arms by stitching an arrowhead pattern between them. This will form a 6 point star patter
-
Now, stitch the 6 outer arms of the snowflake to complete the pattern. Draw the needle to the backside of the hat, tie a knot or 2, and cut off extra thread.
-
Place the mustache near the top-middle part of the beard cutout and then place the beard near the top-middle part of the shirt cutout. Stitch the top side of the mustache along with the beard and the shirt cut out and join them together.
-
Place the shoe cutouts on the bottom side of the base layout by slightly overlapping them with the base.
-
Place the body pattern (beard-mustache-shirt) on the bottom side of the base layout. Prepare the needle with a thread matching the felt of the shirt and stitch around the outer side of the shirt pattern.
-
This is when you will connect the shoes to everything as well, so make sure to catch a bit of the shoe as you go around the shirt.
-
Make sure to keep the top side of the body pattern open for now.
-
Place the hat pattern on the top side of the base layout and this will cover the top side of the mustache and the beard slightly.
-
Now, stitch around the outer side of the hat and join it with the base layout. Keep a small opening to stuff the felt gnome pattern.
-
Use cotton or scrap felt to stuff the gnome pattern.
-
After stuffing the felt gnome pattern, stitch to close the open end.
-
Cut a small wooden bead into half and use fabric glue to attach the half-cut bead right below the middle of the hat, on top of the mustache. Use glue to close the bottom side of the hat or stitch it closed, whichever you prefer.
-
Cut out a small piece of ribbon and form a loop with it. Attach the ribbon loop on the backside of the felt gnome with fabric glue to complete the ornament craft.
Read NextWinter Candy Jar Gnome Bottles


