Textured Diamond Wall
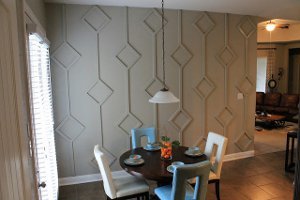
If you like artwork that's out of the box, you're going to love this Textured Diamond Wall. Made with wood accents, this larger than life wall decoration would be great in a large room and can add texture and style in a flash.

Materials:
- (5) 10 ft. 1x4s of first choice pine, as well as, (4) 8 ft. 1x4s (we used the table saw to rip these boards lengthwise)
- Liquidnails
- Dap wood filler
- 1 quart of paint- color match of Benjamin Moore, Senora gray 1530 (eggshell finish used for wall and semi-gloss for diamond treatment)
- Paint brush
- Brads for nail gun
- Fine-grit sandpaper
- Miter saw
- Band saw
- Table saw
- Finishing nail gun
Instructions:
-
Our diamond wall began with a geometry class. First, we decided what size to make the diamonds. I had a very scientific method for this step. I searched around the house for something I could use as a pattern! Then bust out the masking tape.

-
Next, measure the wall and create a piece of graph paper in Excel. Our wall measured 160 inches x 115 inches. The "diamond" is actually a 14 inch x 14 inch square. When turned to form the "diamond" shape, it measures 20 inches from point to point.
-
To determine how many columns: Take the length of your wall and divide it by the size of the diamond. Example: 160 in. / 20 inches= 8 columns
-
Decide on your pattern: Determine the amount of diamonds you want in each column. We decided to use 2 diamonds in the first column, 3 in the second column, then repeat.
-
Use your graph paper to plot out your pattern/spacing.


-
Now it's time to transfer the grid to the wall. John came up with a ninja method for this step! He used thumbtacks and fishing line to create a plumb line. The plumb line marked the center of each column.
-
Next, we marked the line with dots to correspond with the top and bottom points of each diamond on the grid (this included 5 diamonds on 1 line). Since there was only one fishing line, it was important to differentiate between columns. We did this by color coding: Black dots = odd columns and Red dots = even columns.


-
Example: Your fishing line is in place for the first column. Look for black marks on the line. Use black sharpie to transfer this point onto your wall. Next, move the line to the next column. Now look for the red dots (ignore black dots in this column). Use your red sharpie to transfer these points onto the wall. Repeat until all diamond placements are marked on the wall.
-
There you have it...your wall is marked, now bring on the power tools!
-
Once the boards were ripped into our desired width, we began making the diamonds.

-
Once the mitered edges are all cut, put 4 of the pieces together to form the diamond and attach each corner with finishing nails. Now, fill in the nail holes and the corners with dap wood filler. Love this stuff...makes ya feel like you're icing a cake but even better since it changes colors! Goes on pink and dries white.

-
Give it all a good rubdown with fine grit sandpaper. This helps to ensure the paint adheres easily and doesn't show any bumps from the leftover wood filler.
-
Use the band saw to cut your straight pieces. These are not all the same lengths, so measure carefully. We marked each piece on the back with numbers so we knew which piece went where when we were ready to assemble the treatment.

-
Can't believe I don't have any pictures of the painting process, but you all know what that looks like. I would advise to buy a new paint brush though. I bought a Purdy. Good bristles help to cut down on all those annoying streaks.

-
After painting, apply a little liquid nails then smack those babies onto the wall. This is where you get to play connect-the-dots with the red and black dots you marked earlier when creating the grid. In the first row, look for the first black dot and align the top of your diamond with it. If done correctly, the bottom of the diamond should align perfectly with the second black dot. Now move down the wall and repeat. We put finishing nails in for extra stability.


-
After cutting the straight pieces, we put the puzzle together to double check our cuts.

-
Okay, they fit...now for more sanding, painting, and attaching.

- The edges were really rough initially so we sanded them down, added more dap and touched up the paint. This helped create a smoother transition between the pieces.
Read NextMosaic Wall
Your Recently Viewed Projects
georgiewtts
Apr 08, 2013
Maaaaaan! This is good, so retro too, I'm looking round the house to see where I can do it. I had a thought when I saw the fishing line.. that you could maybe use one of those chalk string lines that are used in the building trades...you put it tight against the wall..it's all covered in chalk powder then you ping it and it makes a straight line...anyway just a thought. I love it..now I've just gotta hope the other half will too. Thank you kindly x
congrovel 4855272
Apr 07, 2013
I think this is genius! What a cool way to change a blank wall. Very innovative!
jayell5
Apr 07, 2013
Love the idea. Would look great with a different colour inside the diamonds or use as photo/picture frames.
Report Inappropriate Comment
Are you sure you would like to report this comment? It will be flagged for our moderators to take action.
Thank you for taking the time to improve the content on our site.

