Hoops and YoYo iPhone Case
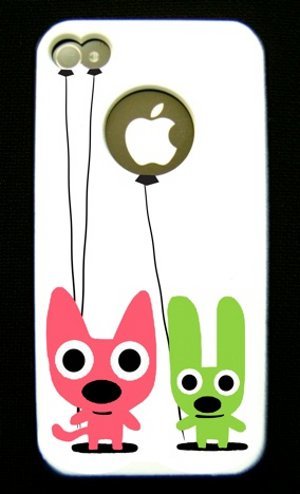
Decorate and protect your phone with this Hoops and YoYo iPhone Case from Gloria Uhler. These colorful characters made popular by Hallmark Creations are sure to give your phone a fun and friendly look. This is a great craft for adults and teens alike, and a cheap and clever way to change the look of your phone in a few easy steps.

Materials:
- Aztek airbrush
- White Paint
- ColorArtz Gremlin Paint
- ColorArtz Cosmic Pink Paint
- Testors Glosscote Clear Lacquer
- Craft knife or scissors
- Paintbrushes
- Fat black permanent marker
- Fine point black permanent marker
- Painters tape
- CardstockComputer
- Printer
- Plain black iPhone case
Instructions:
-
Trace the outside of the iPhone case onto card stock. Make a duplicate copy and set it aside to be used later.
-
On the original, cut inside the case outline to create an opening about 1/8” smaller than the actual case size. Position the opening over the case to act as a mask. Spray the case with white paint. As you do, the stencil will provide a clean edge and prevent paint from getting on the sides of the case.

-
Remove the stencil. If paint has accidentally found it’s way to the black areas, use a craft knife to scrape it off.
-
Trace your favorite Hoops and Yoyo image from a greeting card or magazine, or create your own.

-
Transfer outlines of the Hoops and Yoyo characters on the duplicate copy of the case outline. When you’re done, make a spare copy of the page on card stock and set it aside. Use a craft knife to cut out the character outlines from one copy.

-
Place the cutout character outlines over the dried white paint aligning the edges. Use painters tape to secure the stencil and case and keep them from slipping while you work. Do not put tape directly on the painted surface, as the paint will lift off when you remove the tape.
-
Cut open the ColorArtz pouches and pour the paint in small containers. Following the stencil, outline the pink image with a fine brush and very little paint.

-
When the outline is complete, fill it with pink paint using a thicker brush.

-
Paint the green image with an outline then fill it in.
-
Complete your drawing on your spare outline copy by creating the noses, eyes, and shadow at the feet. You don’t need to draw the pupils of the eyes. This page will be your stencil for the character details. Using a craft knife cut out the shapes you’ve just drawn.

-
Using this stencil, paint all the details, the whites of the eyes, the noses, and the shadows at the feet, by outlining with a fine brush first, then filling in. It will require more than one application of white for the eyes to block out the colors underneath. Use a thin paintbrush to paint the mouths.

-
When the whites of the eyes are finished, use a fat black marker to create the black pupils.
-
Turn the case logo and camera eyeholes into balloons by painting a small triangle at the center bottom of each with the thin paintbrush.

-
Use a fine point marker to draw the strings that connect the balloons to the character’s hands.
- Let the paint dry for a day or more before applying two coats of the Glosscote lacquer. Apply the second coat 20 minutes later but no longer than 2 hours after the first.
Read NextAngel Gift Cans

