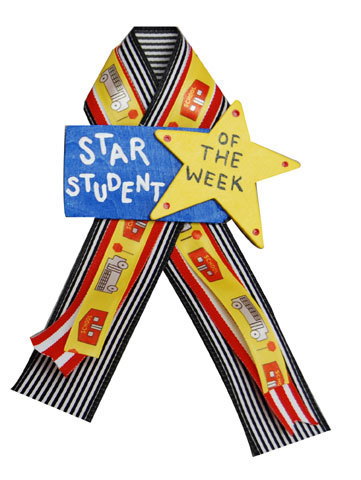
Star Student Badge
Use bright, shining colors and ribbon to make this honor for your student.

Materials:
DecoArt Products Required
Americana Gloss Enamels
- DAG01 - White --- NEW!!
- DAG36 - True Blue --- NEW!!
- DAG67 - Black --- NEW!!
- DAG227 - Bright Yellow --- NEW!!
- DAG265 - Tuscan Red --- NEW!!
Americana Brushes
- DBL1000-B - Liner 0
- DBR2004-B - Round 4
- DBF3012-B - Shader 12
Supplies
- Foam plate
- Lo-temp glue gun and glue sticks
- Three 18" lengths of coordinating ribbons 1/2" - 5/8"
- Flame lighter
- Small wood tag: Lara's Crafts PT1001
- Pin back
- Wooden star: Provo Craft 13-1664
Instructions:
Preparation: Remove all labels or tags from surfaces before painting.
1. Use round brush and Bright Yellow to paint star; let dry.
2. Use shader brush and True Blue to paint wood tag; let dry.
3. Referring to photo for placement, glue star to tag.
4. Use liner brush and White to paint words "star student" on True Blue tag; let dry.
5. Use liner brush and Black to paint words "of the week" on star.
6. Use end of paintbrush dipped in Tuscan Red to dot on tips of star; let dry.
7. Center and layer ribbons with thinnest on top and widest on bottom; glue together at center between layers.
8. Alternate length of ribbons and seal ends of ribbon to prevent fraying by carefully singeing ends with lighter.
9. Fold ribbons in half and overlap just below loop at centers (refer to photo for placement). Glue together between overlap to hold in place. Glue top of ribbon at overlap to back of wood tag.
10. Glue pin back to back of ribbon overlap
Read NextBlessing Bags DIY

