Penguin Glass Bead
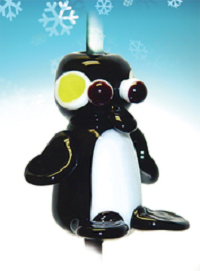
Create a little penguin glass bead from Diamond Tech, perfect for winter jewelry or decorative accents. Step-by-step figures help you create the glass bead.

Materials:
- Moretti glass rods: black, white and yellow
- One each black, yellow and white stringers
- 1 Fireworks Beginner Beadmaking Kit
- Protective eyewear
- Mandrels coated in bead release
- “Flurry” Glass Bead by Val Oswalt
- Glass Bead Project with Step Images
Directions:
-
To form a base bead, heat a mandrel and apply 1” of black glass. Heat thoroughly and use the flat marvering tool to shape the bead into a barrel about 1/2 to 3/4” inches long.
-
Heat white glass rod until it forms a molten ball the size of a large pea. Touch the white rod to the top portion of the base bead and pull gently down the length of the bead. This will form Flurry’s belly. Heat and melt the white belly area until smooth. Use a marver to keep the bead shape.
-
Heat 1/2” of black glass, until melted, add glass at the top of the base bead to form the head. Using a marver, shape and round. Note: make sure the entire bead is being kept hot during each step).
-
Use a white stringer and apply two dots in the shape of a comma on either side of Flurry’s head. Next melt a yellow stringer and create a comma shape on top of the white and melt until smooth. This will be the cheek area.
-
Use a white stringer and apply two dots on Flurry’s head. These will be the eyes. Using a black stringer, dot each eye. Heat the eyes until black and white dots are slightly blended, but still retain shape.
-
Melt a black stringer until it forms a small ball, apply to head area between the checks, this will be the beak. Using a tweezer pull the stringer ball away from the face.
-
Melt a black stringer until it forms a small ball, apply to the head between checks. Using a tweezer pull the stringer ball away from the face to form the beak.
-
Add four small balls of black glass to the arm and leg area. Place into the heat until soft. Flatten each ball with a tweezer to form flippers (Remember to always keep entire bead hot after each step but not too hot to loose the bead features).
-
Fire-anneal your bead by heating and allowing it to cool in the outer regions of the flame for a few seconds: repeat several times then carefully place the bead in the fiber blanket to cool. If available, anneal in a bead kiln.

