Fabric Pumpkin Decor
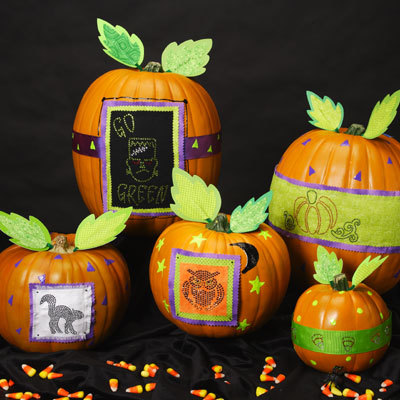
Your pumpkin doesn't have to stay plain or even be carved. You can add some fabric scraps to make your pumpkin a glamorous one. In nine steps you can have a whole presentation of pumpkins with this craft from I Love to Create.

Materials:
- Aleene's® Fabric Fusion™ Permanent Dry Cleanable Fabric Adhesive™
-
Tulip® 3D Fashion Paint
- 26516 Lectric Lime
- 65018 Purple
- 65038 Black
- Aleene's® Fast Grab Tacky Glue®
- Tulip® Glam-It-Up!™ Iron-On Fashion Designs™
- Go Green Frankenstein
- Candy Corn
- Cat
- Owl
- Pumpkin
- Fabric scraps – orange, lime, green, purple
- Small nail
- Ribbon – 1½” wide grosgrain – lime or desired color
- Paper towels
- Cardstock – assorted greens
- Real or faux pumpkins in assorted sizes
- Pencil
- Sewing pins with colored heads
- Pinking shears - optional
- Pressing cloth
- Chenille stems – green – one per pumpkin
- Iron
- Scissors
Instructions:
-
Determine color of fabric for each design to be ironed onto, then iron fabric smooth. Fabric can be frayed if desired. Cut out basic shape then pull threads, leaving about a ¼” border on all sides and trimming as needed.
-
Remove backing sheet from Iron-On Fashion Design™ - they can be cut apart if needed to fit an area - then press design in place on fabric or ribbon. Cover with pressing cloth then iron following package instructions. Let cool then carefully remove plastic sheet.
-
Use scissors or pinking shears to trim edges close to design as shown.
-
Apply a thin bead of Fabric Fusion™ to edge on back of fabric and smooth with fingers. Position in place on backing fabric then lightly press to secure. Repeat step if another layer of fabric is desired.
-
Use pencil to lightly trace leaf pattern onto back of cardstock paper then cut out. Trace small inner leaf on green fabrics.
-
Use scissors to cut chenille stem in half. Apply a thin covering of Fast Grab Tacky Glue® to about 2” along one end of stem then place in center of cardstock leaf. Apply a thin bead of Fast Grab Tacky Glue® to back of fabric leaf, smoothing with fingers, then center on front of leaf and press to secure, sandwiching stem between fabric and paper.
-
Fabric pieces with Iron-On Fashion Designs™ and ribbon are held in place on pumpkins with pins. Push coordinating color of pins into pumpkin.
-
Detail pumpkins with 3D Fashion Paint™. Start paint on paper towel using an even pressure on bottle for a smooth line. Add stars, triangles, moons and dots in desired colors. Let dry.
- Use small nail to poke a hole in top of pumpkin for leaf, cutting stems as needed. Insert chenille stem in hole, pushing down until base of leaf touches to secure.

