Girly Paper Ghosts
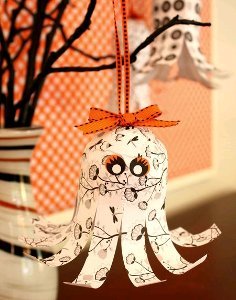
These girly paper ghosts from Shelley Detton are such easy crafts for Halloween parties. Use up paper scraps to make this cute Halloween decorations.


Materials:
- 1 styrofoam ball, 2 1/2" in diameter
- Scrapbook paper (not cardstock), 8 1/2" wide x 9 1/2" long (length can vary)
- 3/8" ribbon for bow, 10" long
- 1/8" ribbon for hanging, 12" long
- 1/2" paper circles in black (2) and orange (2)
- 1/4" paper circles in white (2)
- 2" long floral wire or paper clip that has been pulled apart and clipped in half
- ModPodge or other clear varnish, mat finish (not shiny)
- Old brush to apply ModPodge
Instructions:
-
Prepare paper by cutting slits in the top and bottom (the paper is shown from the backside to show the cuts better). Using scissors, cut approx. 1/2" wide slits about 1 1/2" down from the top. This will create the curved head. Cut approx. 3/4" wide slits up about 5" from bottom (assuming you started with 9 1/2" tall paper). This will create the flowy tail. Leave about 3" or 4" of uncut paper where the ball is going to be. As you can see, it's not important to cut the slits exactly even, so don't obsess about getting them perfect. You can also using pinking shears on the bottom edge.

-
Using a chip brush or old brush, apply ModPodge on the upper portion of the back of the paper. Don't brush it on all of the solid (uncut) paper. Just about in the middle is fine.

-
Place the ball on the paper and gently wrap the paper around the ball, creating a tube. See photo for where the ball should be inside the tube. (You are looking at the top of the ghost)

-
Carefully fold over strips of paper on top of the ball, starting at the seam and laying down one strip after the other in a clockwise direction. When all strips are down, use brush to coat the top of the paper with more ModPodge. It is only necessary to coat the parts which you just folded over, not the entire ghost body.

-
Let dry in an upright position. If ghost body is long like this one, you can fit it over a glue bottle or some other skinny, tall object so it doesn't fall over.
-
Meanwhile, prepare the ghost features. Tie the 3/8" ribbon in a bow, clip ends off at diagonal. Cut eyelashes out of black circles by clipping tiny triangles out of one side. Save time by clipping two black circles at once. Glue the black eyelashes to the orange circles, offsetting slightly so more orange shows. Glue white dots onto black. Bend wire into a U shape, or cut off half of a paper clip to create the same shape.

-
Using a large pair of scissors, gently curl the paper like you would curl ribbon. Place the blade on the printed side of the paper and brace softly with the thumb of the hand holding the scissors. Lightly run the blade down the length of the strip, and it will curve the paper slightly. For a tighter curve, brace with thumb a little more firmly as you draw the blade down. Repeat process for all strips.

-
Insert U shaped wire into top of ghost. You will likely need to "pre-drill" the holes by twisting a sharp, skinny object (such as a large pin or toothpick) down through the stiffened paper before inserting the blunt-edged U shaped wire. Especially if you're impatient like I am and try to insert wire before paper is totally dry = much harder to pierce semi-soggy paper. Insert wire almost entirely into ball, leaving just enough room to slip the skinny ribbon under it.

-
Thread the skinny ribbon through wire, and push down wire almost all the way into ball so it hardly shows. Glue ribbon bow and the eyes in place, and you're done!

Read NextWhich Witch DIY Costumes
Your Recently Viewed Projects
jennifersbabyshowe rgifts 4894647
Sep 11, 2013
This is sooooooo cute. These ghosts will be a great addition to my decorations. I can't wait to see these on my Halloween Tree this year.
Report Inappropriate Comment
Are you sure you would like to report this comment? It will be flagged for our moderators to take action.
Thank you for taking the time to improve the content on our site.

