Spooky Halloween Caps
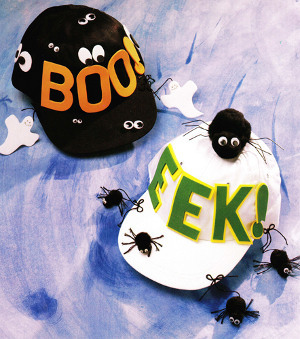
Both adults and kids will love wearings these fun caps to greet trick-or-treaters on Halloween. Create a bat or ghost theme hat with craft foam and these instructions from Heidi Borchers of Inspired at Home.

Materials
- For each: Aleene’s® Super Thick Tacky Glue™
- 3” high block style alphabet stencils
- Black embroidery floss
- For BOO cap: black fabric cap
- Craft foam: orange, white, black
- Fine-tip permanent black marker
- Wiggle eyes: 4 (1/2”), 2 (1/2”), 4 (5/8”)
- For EEK! Cap: white fabric cap
- Craft foam: green, yellow
- Black pom poms: 1 (2-1/2” diameter), 1 (1-3/4” diameter), 2 (1” diameter), 4 (3/4” diameter), 2 (1/2” diameter)
- Wiggle eyes: 2 (1/2”), 4 (1/4”), 4 (3/16”)
- 8 (3”) lengths black telephone wire (available at hardware stores)
- Patterns
Instructions for BOO! cap:
Transfer stencil patterns to orange craft foam and cut 1 B, 2 O’s and 1 exclamation point. Transfer pattern to craft foam and cut 2 ghosts, 2 small eyes, and 4 large eyes from white and 2 small pupils and 4 large pupils from black. Draw facial features on each ghost with marker, reversing 1 ghost. Cut 2 (5”) lengths, 1 (4-1/2”) length, and 1 (2-1/2”) length of embroidery floss. Tie each 5” length in bow. Glue 1 end of 4-1/2” length to top back of 1 ghost. Glue free end of floss length to bill of cap at 1 side (see photo). Glue 1 bow in place on top of glued floss on cap. Repeat to attach remaining ghost to cap, using 2-1/2” floss length and remaining bow. Let dry.
Referring to photo, glue foam pieces and wiggle eyes in place on cap as desired. Let dry.
Instructions for EEK! Cap:
Transfer stencil patterns to craft foam and cut 2 E’s, 1 K, and 1 exclamation point each from green and from yelow. Trim 1/8” all around from each green piece. Center and glue green pieces on top of matching yellow pieces. Let dry. Glue letters in place on cap (see photo).
Glue 1-3/4” pom pom to 2-1/2” pom pom to form body of large spider. Shape each telephone wire length to form legs of spider. Dip 1 end of each wire into glue. Push glued end of each wire into large pom pom of spider. Glue ½” wiggle eyes to small pom pom of spider. Let dry. Glue spider to top of cat.
Glue 1 (1”) pom pom to each of 2 (3/4”) pom poms to form medium spiders. Glue 1 (1/2”) pom pom to each remaining ¾” pom pom to form small spiders. Let dry. Glue ¼” wiggle eyes to ¾” pom poms on medium spiders and glue 3/16” wiggle eyes to ½” pom poms on small spiders. Let dry. Thread needle with embroidery floss. Stitch through body of 1 medium spider from top to bottom, leaving 3-1/2” tail of floss above body for hanger. Reinsert needle throug body, exiting body at 1 side. Take 3 stitches through body from side to side, leaving 1” long loops on each side of body. Clip loops and trim thread to form 4 (1” long) floss legs on each side of body. In same manenr, add floss legs and hangers to remaining medium spider and 1 small spider. Glue free end of each floss hanger to bill of cap. Cut 3 (6”) lengths of embroidery floss. Tie each length in bow. Glue 1 bow in place on top of each piece of glued floss on cap. Let dry.
Cut 4 (2-1/2”) lengths of embroidery floss. Handling all lengths as 1, fold lengths in half and glue fold to bottom of body of remaining small spider. Glue small spider to bill of cap, arranging floss legs on each side of spider body. Let dry.
Your Recently Viewed Projects
Weberme
Oct 23, 2018
Do you or sommeone you know like hats and getting into holiday moods then you have got to see these hats and they are so easy to do. You can gather any kind of halloween things from the dollar stoore or make yorself and if you have a cricut it can make it fast too. I love the spider one a lot. You can even buy a bag of them at the dollar store or make your own. I would glue on some spiderwebs on the hat too. I bet this would be sooooo fun.
Report Inappropriate Comment
Are you sure you would like to report this comment? It will be flagged for our moderators to take action.
Thank you for taking the time to improve the content on our site.

