Witch's Halloween Tree Centerpiece
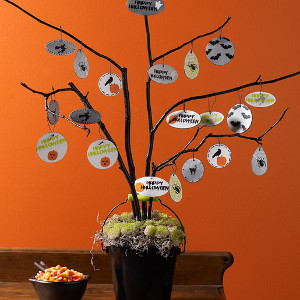
It's charming and it's ghoulish. In fact, this Witch's Halloween Tree Centerpiece is just the right Halloween decoration idea for your banquet table. Paint your own eerie tree with this easy tutorial. Your guests will be delighted at the trees simplicity and spookiness. You will be able to hang even more little Halloween trinkets that normally don't get displayed. Even consider a few whimsical Halloween earrings as ornaments. This Witch's Halloween Tree is a fun Halloween decorating idea that can be used year after year.
Primary TechniqueGeneral Crafts

SeasonFall
Materials:
- Martha Stewart Crafts ® 2oz Multi-Surface Satin Acrylic Craft Paint - Granny Smith
- Martha Stewart Crafts ® 2oz Multi-Surface Satin Acrylic Craft Paint - Mace
- Martha Stewart Crafts ® 2oz Multi-Surface Satin Acrylic Craft Paint - Wedding Cake
- Martha Stewart Crafts ® 2oz Multi-Surface Satin Acrylic Craft Paint - Beetle Black
- Martha Stewart Crafts ® 2oz Multi-Surface High Gloss Acrylic Craft Paint - Beetle Black
- Martha Stewart Crafts ® 2oz Multi-Surface Metallic Acrylic Craft Paint - Sterling
- Martha Stewart Crafts ® Spray Paint Kit-Gloss Finish
- Martha Stewart Crafts ® Foam Pouncers Set - 6pc
- Martha Stewart Crafts ® Holiday Icons II Adhesive Stencils
- Galvanized tin pail
- Loew Cornell Woodsies
- Assorted sized wood balls
- Small crystal beads
- 18 Gauge copper wire
- Styrofoam or floral foam
- Moss
- Hot glue gun
- White vinegar
- Foam plate
- Paper towels
- Brush basin or container for water
- Hand drill with small drill bit
Instructions:
Spray Painting
- Wash tin pail in warm soapy water and allow to thoroughly dry. When dry, wipe with white vinegar damped paper towel to remove any remaining grease or soap film.
- Prepare Beetle Black Gloss for spraying following directions on Spray Paint Kit. Spray branches and metal pail. Allow to dry.
- Clean Spray Paint Kit following recommended directions and cap any remaining paint mixture for future use
Painting and Stenciling
- Drill a small hole in assorted shaped woodsies.
- Basecoat wood shapes in Wedding Cake and Sterling, allow to dry and reapply if necessary.
- Using assorted Halloween Adhesive Stencils, stencil designs onto prepared wood shapes. Load pouncer in color of choice, Beetle Black, Granny Smith, Mace or Wedding Cake and dab color through stencil using a straight up and down motion.
- Paint small wood balls Granny Smith. Using a pouncer, paint a few clumps of moss Granny Smith as well. Allow to dry.
Finishing
- Hot glue Styrofoam or floral foam into metal pail.
- Position and secure branches into foam using hot glue.
- Add moss to top of pail to cover foam. Add Granny Smith painted moss to top of pail. Moss may be secured with hot glue.
- Cut copper wire to desired length and create curved hook at one end by wrapping around a pencil or paint brush handle. Attach copper hooks to wood ornaments. Hang from branches.
- Cut additional copper wire and create small loop to close. Feed small crystal bead and Granny Smith ball onto wire; create hook and hang from tree.
Why This Halloween Craft is Scary Great!
1. Unique Halloween Decor: The Witch's Halloween Tree Centerpiece is a one-of-a-kind decoration that will set your table apart from the rest. Its eerie charm will delight your guests and create a spooky atmosphere for your Halloween festivities.
2. Personalized Touch: By painting your own tree, you can customize it to match your Halloween decor theme. Add your own flair with different colors, patterns, and embellishments to make it truly your own. Hanging little Halloween trinkets and whimsical earrings as ornaments gives you the chance to showcase your creativity.
3. Reusable Year after Year: This craft project is not only fun to make, but it's also a durable decoration that can be enjoyed year after year. You can bring out your Witch's Halloween Tree Centerpiece every Halloween season to add a touch of spookiness to your home. It's a cost-effective and sustainable way to celebrate the holiday.
Read NextCandy-riffic DIY Mason Jars


