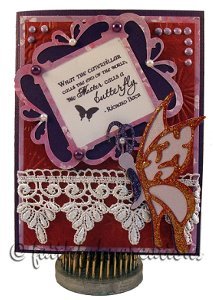
Breathtaking Butterfly Card
Card making, paper crafting, I love to do it all. The regal colors of this card from Craftwell are sure to inspire anyone who's going through hard times.

Materials:
- eCraft Machine
- Swirls and Flourishes SD Card
- Fundamentals 2 SD Card
- A2 Card Base
- 4” x
- 5.25” Cardstock
- 3.75” x 5” Cardstock
- Paper for cuts and stamped image
- Manual embossing machine and folder
- Lace
- Stickles, Diamond and Lavender
- Flat backed pearls
- Tulip Puff Paint
- Adhesive, ATG, Elmer’s Fabric & Craft Glue
- Verve Stamps, Beautiful You set
- Versafine Ink, Imperial Purple
- Pop
- Dots
- Glue Dots
Instructions:
- Emboss the 3.75” by 5” Cardstock with desired design.
- Adhere this piece to the 4” x 5.25” cardstock. adhere lace or ribbon to the bottom of the card base and set aside.
- Using the Swirls and Flourishes sd card, cut the ‘Swirl Frame 1 Background’ at 3.5”
- Using the Swirls and Flourishes sdvcard, cut the ‘Swirl Frame 1 Cut-Out’ at 3.5”
- Using scrap paper, cut a square to fit inside the ‘Swirl Frame 1 Cut-Out’ (approx. 1.75” x 2”)
- Using Fundamentals 2 sd card, cut ‘Butterfly 3’ at 4” without the pen loaded. Cut twice in two different colors.
- Using Fundamentals 2 sd card, cut ‘Butterfly 2 Onlay 1’ at 4”.
- Using Fundamentals 2 sd card, cut ‘Butterfly 2 Onlay 2’ at 4”
- Stamp your sentiment on your scrap paper square.
- Adhere sentiment to back of ‘Frame 1 Cut-Out’. Adhere to ‘Frame 1 Background’. embellish as desired.
- Cut off antennaes on 2nd ‘Butterfly 3’. cut the body off the ‘Butterfly 3 Onlay 1’ image. Glue onlay to Butterfly 3 image.
- Glue the body of your ‘Butterfly 3’ to 1st ‘Butterfly 3’ cut, addStickles if desired and fold the wings up when dry to add dimension.
- Adhere frame with sentiment and butterfly to card as desired. use Pop Dots for the framed sentiment and glue dots for the butterfly.
- Lastly, using puff paint (if desired) add some faux pearls wherever desired
Read Next64 Handmade Cards for Every Occasion

