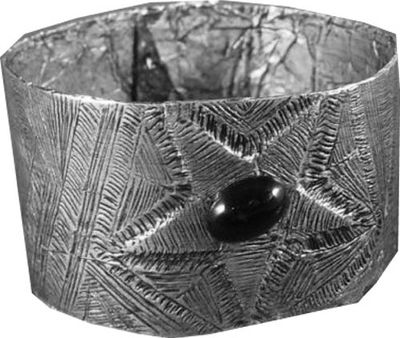
Faux Forged Foil Bracelets
Turn regular aluminum foil into bracelets with the look of forged foil. The look is chic boutique, but for a fraction of the price. For help with creating forged foil from alumninum foil, check out this tutorial. This project comes to us compliments of Heidi Borchers for Inspired at Home.

Materials:
- Thin flexible cardboard scraps - one 1-1/2” x 9-1/2” strip for wide bracelet, one 1” x 9-1/2” strip for narrow bracelet
- Aluminum foil
- Aleene’s® Super Thick Tacky Glue™
- Toothpick
- Scissors
- Pencil
- Waxed paper
- Paper towels
- Acrylic paint – black
- Paint brush – one for glue, one for paint
- Clear brush on (or spray-on) sealer finish
- Black flat-back jewels (plastic, glass or stone)
- Clothespins
Instructions:
- For wide bracelet, draw star pattern on cardboard scrap and cut out. Center and glue star to 1 side of 1-1/2” x 9-1/2” cardboard strip. Let dry. Cut 1 (4” x 10-1/2”) strip of foil.
- For narrow bracelet, cut 2 (3/4” diameter) circles and 1 (7/8” diameter) circle from cardboard scraps. Center and glue larger circle to 1” x 9-1/2” cardboard strip. Glue 1 smaller circle on each side of large circle. Let dry. Cut 1 (3” x 10-1/2”) piece of foil.
- For each, spread a coat of glue with brush or finger on right side of cardboard strip. With shiny side up and edges of foil extending beyond edges of cardboard, press foil into glue. Smooth foil with fingers, molding foil over cutouts. Fold excess foil to back of cardboard, overlapping edges, and glue to secure.
- Use a toothpick to gently imprint design into foil. Be careful not to press too hard or foil may tear. Let dry.
- To antique bracelets, pour a small puddle of black paint on waxed paper. Add a small amount of water to paint. Brush thinned paint on design. Immediately wipe off excess paint with paper towel, leaving paint in crevices to highlight imprinted design. Let dry. Apply 1 coat of sealer to design.
- For wide bracelet, center and glue jewel to star. Let dry. For narrow bracelet, center and glue 1 jewel to each circle. Let dry.
- For each, curve bracelet into a circle, overlapping ends ½” (or adjust overlap to suit your wrist size). Glue ends together. Use clothespins to hold ends together until glue is dry.

Heidi’s Designer Tips: For a different look, try foiling with colored florist’s foil (without paper or plastic backing). Some of these foils come in beautiful colors and textures that enhance the look of your look of forged foil project.
Read NextLightweight Gift Box Earrings
Your Recently Viewed Projects
Member 6886713
Jul 01, 2011
i really enjoyed the idea about making jewelary out of aluminum foil,those bracelets are adorable linda
Report Inappropriate Comment
Are you sure you would like to report this comment? It will be flagged for our moderators to take action.
Thank you for taking the time to improve the content on our site.

