Wire Jump Rings
Use a Beadalon Jump Ring Maker to create your own Wire Jump Rings from Julianna Hudgins. This is an easy-to-follow tutorial that will teach you the basics of jewelry making. Add jump rings to a variety of jewelry projects - you'll love the overall aesthetic.

Materials:
- Beadalong Jump Ring Maker
- Artistic Wire – 18 gauge (color of your choice)
- Beadalon Flush Cutter
- Beadalon pliers: Chain Nose and Bent Chain Nose
Instructions:
- The jump rings are made with 18 gauge wire and the Beadalon Jump Ring Maker. With a wide variety of mandrels available – ranging from 4mm to 16mm, round and oval shapes – you can create just the jump ring you need.

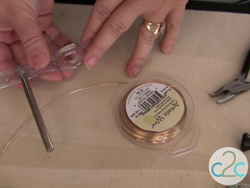
- Insert the end of the wire through the small hole in the base; fold the wire down to secure it.

- Insert your finger into the large hole in the base and turn it clockwise, while steadily holding the mandrel and wire in the other hand. In this step, you can see that I have wound the wire about 10 times around the mandrel.

- Once the wire is coiled, remove it from the base and cut the coil from the wire spool with the Beadalon Flush Cutter.

- Next cut the first few loops with the Flush cutter. These rings will now be cut from the coil but you can hold them in place for the next step.

- Turn the Flush cutter to the opposite side and cut the jump rings again just slightly to the side of your first cut.

- Now you will have two straight-edge cuts on your jump rings so that they will fit perfectly together.

- Use your pliers to gently work the jump rings closed. You should hear and feel the two pieces gently rub together when you do this step.You can make the right sized jump rings in the colors and plating you choose – any time you want!

For a comprehensive video tutorial, check out How to Make Wire Jump Rings.
Read NextLightweight Gift Box Earrings
Your Recently Viewed Projects
GeorgiaAnn
Mar 11, 2012
I know advertising is necessary, since all free is....free. But, some ads can be annoying. The ones recently added fit this catergory. They are above and over the bottom of each photo. Is it necessary to place them there? Thanks
Report Inappropriate Comment
Are you sure you would like to report this comment? It will be flagged for our moderators to take action.
Thank you for taking the time to improve the content on our site.

