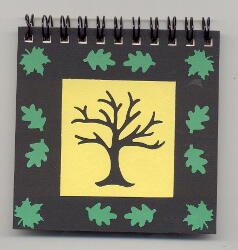
Ancient Spirit Journal Cover
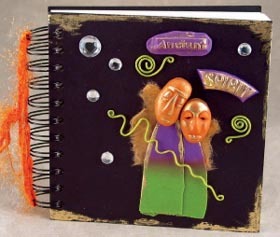
Clay embellishments really make this ancient spirit journal your own. Try it for yourself or create your own patterns and design. This handmade clay project also makes a great scrapbook cover.
Materials:
- 6" x 6" Spiral Bound Journal
- AMACO® Designer Push Molds™ — Tribal
- AMACO® Pasta Machine (or Acrylic PolyRoller)
- AMACO® PolyBlade Cutting Blade
- FIMO® Soft Polymer Clay, 2 oz. — Cognac, Plum and Lime Green
- FIMO® Gloss Lacquer
- AMACO® Fun Wire™ Clear Green, 18 Gauge
- Freezer Paper
- Masking Tape
- Baking Sheet Dedicated to Polymer Clay Use
- Home Oven or Dedicated Toaster Oven
- Crystal Clear Acrylic Faceted Stones
- 2-3 Strands Decorative Fibers or Yarns in Orange
- Mulberry (or Hand Made Paper) in Tan or Gold
- Beacon Adhesive Co.: Glass, Metal, and More™ Premium Permanent Glue
- Black Seed Beads (2)
- Jewelry Pliers
- Index Cards
- Old Paintbrush
- Toothpicks
Steps:
- Cover work area with freezer paper and tape corners to hold in place. Beginning with lightest color first, knead 1 oz blocks of each clay color to condition. Follow instructions found in push mold package to create face shapes from Cognac. Bend one face (taller, male form) to match side curve of remaining face (female form). Use toothpick to pick up and insert seed bead “eyes” into eye area of one face (female form shown here).
- Make a finger size rope of Plum FIMO®. One at a time, place a section of rope over push mold to create words “Ancient”, leaving a ledge of excess clay around edges and “Spirit”. Roll visible back side of clay with roller to make even then flex mold to remove. Trim excess clay with cutting blade if needed and place all pieces onto index cards.
- Gradually add small pieces of Cognac into a 1 oz block of Lime Green, blending the two colors until you reach an earthy “Sage Green” color tone. With pasta machine set on #2 setting, pass clay through 4 or 5 times to remove any air bubbles and make a flat sheet. Pass a one ounce ball of Plum clay through pasta machine set on same setting to make a second flat sheet.
- Make a Skinner Blend for bodies. Cut long side edges of each clay color. With pasta machine on #1 setting, position both colors side by side and run through together, joining and blending the colors only at seams. Fold in half from bottom to top, matching colors at both ends and repeat. Pass through the pasta machine several more times, repeating the folding process until colors fade gradually into one another at seam area only.
- Place the newly blended clay sheet onto freezer paper and tear bottom (Green) edge of clay to make a jagged line. Flex cutting blade to create curved side edges of male body form first (shown on left). Stack onto remaining clay sheet and cut female body form (shown behind male body form; matching left side edge and extending beyond right side.).
- With all clay pieces on index cards place onto baking sheet and bake following manufacturers’ directions. Let cool completely.
- Apply lacquer to clay in areas where Gold highlights are to be added — one small section at a time. Use old paintbrush to apply Gold powder onto the still wet lacquer. Repeat as needed to highlight remaining clay pieces and for side edges of spiral bound journal. Let dry.
- Use jewelry pliers to bend Clear Green FunWire™, creating “arms” and swirls.
- Glue a torn piece of Tan paper to back of bodies; then to journal. Glue all remaining pieces referring to photo as a guide. Use toothpick to apply small dots of glue to wire before adhering. Let dry. Weave decorative yarns and fibers through spiral binding and tie in a knot.

