Fabric Covered Coasters
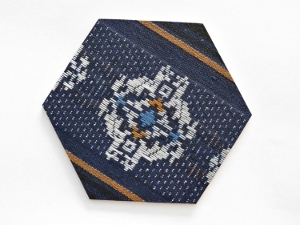
Use an intricate fabric design to create these Fabric Covered Coasters. DIY drink coasters like these make great gifts for anyone on your list, and they're a great way to work through that pile of fabric scraps! It's super easy and fun to make your own coasters, and you'll have so much fun creating these fabric coasters for everyone on your gift list.

Materials:
- Six hexagon-shaped wooden coasters, easily obtainable from most craft shops
- Suitable fabric
- Mod Podge
- 10/32” paintbrush
- Pair of ordinary scissors
- Quick-drying spray varnish
- Felt in a matching color to glue to the bottom of the coasters
- Old newspaper to protect the working area
- Hairdryer
Instructions:
-
Cut a piece of fabric that is slightly bigger that the coaster.

-
Paint a thick layer of Mod Podge over the front of the coaster. Keep the edges and the back of the coaster clean.
-
Carefully place the fabric onto the coaster, the right side of the fabric facing upwards.
-
Working from the middle of the coaster, and from the inside towards the outside, rub out all the air bubbles from the back of the fabric. Check that the fabric sticks properly to the edges of the coaster.
-
Dry the coaster thoroughly with the hairdryer.
-
Cut off any fabric that protrudes beyond the edges of the coaster.
-
Paint a second layer of Mod Podge over the fabric on the coaster, and dry with the hairdryer again.
-
To protect the fabric and allow easy cleaning, apply one coat of the quick-drying spray varnish, and allow to dry thoroughly.
-
Cut the felt to the correct size and glue to the back of the coaster, so that the project will have a neat finish. Apply one coat of the quick-drying spray varnish to the felt.
- Complete the rest of the set of coasters in the same way.
Read NextTiny Teacup Topiary

