Fruity Jubilee Plate
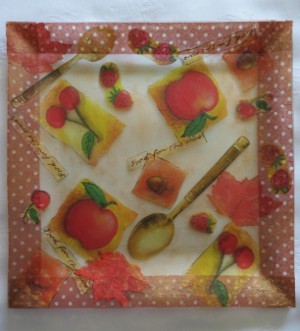
Perfect for summer entertaining, this Fruity Jubilee Plate is a wonderful and fun way to present slices of fresh fruit, yummy appetizers, or delicious desserts. You could use this decoupaged plate as a decorative table centerpiece or you could even give it as a gift to a new neighbor. Decorated with colorful cut-up napkins, this Fruity Jubilee Plate is budget-friendly and great for crafters of all skill levels.

Materials:
- Clear square-shaped glass plate
- Suitable napkins for this project, strips cut from a tan-colored napkin with white polka dots were used, and the collage was made from pictures cut from three different napkins
- Heritage Satin Mod Podge
- Quick-drying clear matt spray varnish
- Dala bronze antique rub
- 10/32” paint brush
- Hairdryer
- Pair of standard scissors
- Few sheets of old newspapers to protect the working area
- Old cloth
Instructions:
-
Wash the plate in warm soapy water and then dry it thoroughly with a dry cloth.
-
Cut 1.1” strips from the tan-colored napkin with white polka dots.
-
Use these strips to add a border around the glass plate. Remove the bottom layers from all the napkin strips. Paint a thin layer of Mod Podge to the one edge of the plate. Put the first strip of napkin in position on the edge of the plate, and press down lightly so that it will stick to the plate. Be careful not to tear the napkin. Paint Mod Podge over the strip of napkin. It is best to start painting from the middle of the strip towards the sides, working in small triangles.

-
Use your index finger to gently rub out any air bubbles from the back of the strip. Rub from the inside towards the outside and be careful not to tear the napkin.
-
Repeat with the other strips until the border has been completed, and use the hairdryer to dry the border of the plate. Do not use the highest heat setting on the hairdryer, as the plate might become too hot to handle.
-
Cut out the pictures from the different napkins and decide how they will be arranged on the plate. To make the design for this plate, the following pictures were used: spoons; tomatoes; cherries; acorns; autumn leaves and strawberries, as well as the quote “Food for the Mind.”
-
Remove the bottom layers from all the napkin pictures. Add a thin layer of Mod Podge to the plate where the first picture will be placed. Put the picture in position and press down lightly so that it will stick to the plate. Be careful not to tear the napkin. Paint Mod Podge over the picture, again painting from the middle of the picture towards the sides, working in small triangles. Use your index finger to gently rub out any air bubbles.
-
Repeat with the other pictures until the collage has been completed, and use the hairdryer to dry all the pictures.
-
Use the old cloth to gently apply bronze antique rub between the pictures, and to highlight the corners and certain parts of the border of the plate. Dry it thoroughly with the hairdryer.
-
Paint a layer of Mod Podge over the top side of the plate. The Mod Podge will protect the pictures and give the product a smoother finish. Dry the plate thoroughly with the hairdryer.
-
Repeat step 10 you need to apply at least 3 coats of Mod Podge, but remember that with every layer, the direction in which the Mod Podge is applied, must be changed from horizontal to vertical to horizontal, etc. Also, remember that after every layer of Mod Podge, the plate must first be dried thoroughly with the hairdryer.
- To protect the plate from wear and tear, apply one coat of the quick-drying spray varnish to the top of the plate and allow to dry thoroughly.
Tips:
- To clean, wipe gently with a damp cloth and do not use strong detergents. Not dishwasher safe.
- The plate can also be used to contain fresh fruit.
Read NextMagical Forest Trivet

