Recipe Box Redo
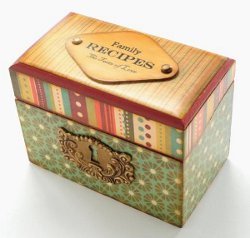
Start small when learning a new technique. Decoupage is a great way to revitalize an old piece, and a small project is quick and easy!

Materials:
- Wood recipe box
- Mod Podge Matte
- FolkArt Acrylic Paint – Alizarin Crimson
- Scrapbook paper, 4 sheets of coordinating – I used We R Memory Keepers Grandma’s Kitchen Collection
- Antique keyhole embellishment
- Brass brads, 2
- Chipboard/thin cardboard from a cereal box
- 1/8 inch hole punch
- Tim Holtz Distress Ink – Vintage Photo
- Cosmetic wedge
- Computer and printer
- Workable Fixatif Spray
- Sandpaper
- Hot glue gun
- Mod Podge Clear Acrylic Sealer – Matte (Optional)
Instructions:
-
Remove hardware from recipe box; set aside.
-
Paint outside lid edges, inside, and inside edges with Alizarin Crimson. Allow to dry.
-
Measure and cut paper to fit around and completely cover the outside base of the box; set aside.
-
Measure and cut paper to fit around the rim of the lid, 1/8 inch shorter than the lid so you have a border revealing the painted section; set aside.
-
Measure and cut a piece of paper to fit the top of the lid allowing a ¼ inch border to reveal some of the painted section.
-
Use the cosmetic wedge and dab onto the distress ink pad, then distress the edges of the papers. Adhere all papers using Mod Podge while smoothing out any air bubbles with your hands. Allow to dry.
-
Continue distressing all corners and edges as before until you achieve a desired aged look.
-
Apply 2 coats of Mod Podge to entire outside of the box. When applying the coats, go in one direction then the other and let dry between coats. Allow to dry.
-
Cut out a rounded diamond shape using chip board or cereal box; set aside.
-
Use a computer to generate a message for the top of your box (for example: Family Recipes The Taste of Love) Once you have achieved the desired size, print it out on a piece of coordinating scrapbook paper and spray with a coat of workable fixatif (to prevent bleeding). Allow to dry.
-
Use Mod Podge to decoupage your message to the diamond cutout. Allow to dry then sand edges smooth (sand downward in one direction to prevent the paper from lifting or tearing), distress edges as before then seal with a coat of Mod Podge. Set aside to dry.
-
Use hole punch to punch holes in diamond shaped tag; add brads.
-
Attach tag to top and keyhole embellishment to the front of recipe box as shown.
-
Replace hardware and allow to dry for 24 hours before using.
-
If desired, seal recipe box with Mod Podge Clear Acrylic Sealer.
Find this and 11 other great decoupage crafts in our FREE "Quick and Easy Decoupage" eBook.
Read NextMartha Stewart Knockoff Canisters
Your Recently Viewed Projects
Weberme
Jan 29, 2018
Decopage is such a fun project and can transforn something simple into something beautiful or fun. The key is to start with a simple little project fist so you do not get overwhelmed on the fist project. This is something anyone can do. I really like this receipe box and would be a great gift especially if you put receipes in them. This is also a great way to make that old box look new. There are no limits on what you can come up with. Make it vintage with lace or modern. Its your choice. Super easy tutorial.
Marilyn B
Mar 03, 2017
What a wonderful idea! Having a personalized phrase or name on the top would make this a lovely keepsake or way to remember grandma's recipes handed down from generation to generations. Make several for gifts and fill with the recipies! Would make a great bridal shower gift! For even more fun, embellish with some gems or beads or top,with ribbon! Thanks for sharing such detailed instructions! A great and practical idea for either a new plain box or to upscale an older one.
Report Inappropriate Comment
Are you sure you would like to report this comment? It will be flagged for our moderators to take action.
Thank you for taking the time to improve the content on our site.

