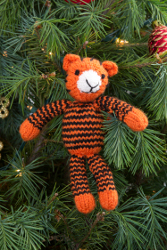
Tracy the Tiger Ornament
If you're a crafter of many skills, then put them to the test by making your very own Tracy the Tiger Ornament. This homemade Christmas ornament is a Christmas knitting pattern, so any avid crafter will want to take on this project for a new challenge. This cutie will bring a lot of attention to your tree, and you're sure to impress with your impressive detailing skills. Kids in particular won't be able to resist this cute animal ornament.
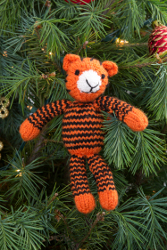

Finished Size 7½" (19 cm) tall.
RED HEART® Super Saver®: 10 yards of 316 Soft White A, 1 skein each of 256 Carrot B, and 312 Black C.
Susan Bates® Double Pointed Knitting Needles: 3.75 mm [US 5].
Stitch marker, stitch holder, yarn needle, fiberfill, black embroidery floss and embroidery needle.
GAUGE: 22 sts = 4" (10 cm), 20 rows = 4" (10 cm) in Stockinette Stitch. CHECK YOUR GAUGE. Use any size needles to obtain the gauge.
Buy Yarn
(4 Medium) RED HEART® Super Saver®, Art. E300 available in solid color 7 oz (198 g), 364 yd (333 m); multicolor, heather, and print 5 oz (141 g), 244 yd (223 m), flecks 5 oz (141 g), 260 yds (238 m) skeins.
Special Stitches
Increase – Knit into the front and the back of the next stitch (1 stitch increase).
Notes:
1. Body components are worked separately and are sewn together using cast on and bind off ends.
2. Stuff body components firmly with fiberfill as they are worked.
LION
Head
With A, cast on 6 sts, leaving a long end for sewing. Join, being careful that sts are not twisted, and begin working in the round. Place marker for beginning of round.
Round 1 (Right side): Work Increase around: 12 sts.
Rounds 2-4: Knit around, at end of Round 4, drop A.
Round 5: With B, knit around.
Round 6: (K1, work Increase) around: 18 sts.
Round 7: (K2, work Increase) around: 24 sts.
Round 8: (K3, work Increase) around: 30 sts.
Rounds 9-16: Knit around.
Round 17: (K3, K2tog) around: 24 sts.
Round 18: (K2, K2tog) around: 18 sts.
Begin stuffing Head firmly with fiberfill as Rounds 19-21 are worked.
Round 19: (K1, K2tog) around: 12 sts.
Round 20:(K1, K2tog) around: 8 sts.
Round 21: K2tog around: 4 sts.
Cut yarn, leaving a 8" (21 cm) end. Thread yarn needle with the end and weave through remaining stitches, draw up firmly; fasten securely.
Body
With B, cast on 6 sts, leaving a long end for sewing. Join, being careful that sts are not twisted, and begin working in the round. Place marker for beginning of round.
Round 1 (Right side): Work Increase around: 12 sts.
Round 2: (K1, work Increase) around: 18 sts.
Round 3: (K2, work Increase) around: 24 sts.
Round 4: (K3, work Increase) around, drop B: 30 sts.
Round 5: With C, knit around, drop C.
Round 6: With B, knit around, drop B.
Rounds 7-17: Repeat Rounds 5 and 6, 5 times, then Round 5 once more.
Round 18: With B, (K3, K2tog) around, drop B: 24 sts.
Round 19: With C, knit around, drop C.
Round 20: With B, (K2, K2tog) around, drop B: 18 sts.
Round 21: With C, knit around, drop C.
Begin stuffing Body firmly with fiberfill as Rounds 22-24 are worked.
Round 22: With B, (K1, K2tog) around, drop B: 12 sts.
Round 23: With C, knit around, cut C.
Round 24: With B, K2tog around: 6 sts.
Cut yarn, leaving a 12" (30 cm) end. Thread yarn needle with the end and weave through remaining stitches, draw up firmly; fasten securely.
Legs (Make 4)
With B, cast on 6 sts, leaving a long end for sewing. Join, being careful that sts are not twisted, and begin working in the round. Place marker for beginning of round.
Round 1 (Right side): Work Increase around: 12 sts.
Rounds 2-5: Knit around.
Round 6: (K4, K2tog) around, drop B: 10 sts.
Round 7: With C, knit around, drop C.
Round 8: With B, knit around, drop B.
Begin stuffing Leg with fiberfill as Rounds 9-24 are worked.
Rounds 9-24: Repeat Rounds 7 and 8.
Cut yarn, leaving a 10" (25 cm) end. Thread yarn needle with the end and weave through remaining stitches, draw up firmly; fasten securely.
Ears (Make 2)
With B, cast on 6 sts, leaving a long end for sewing.
Row 1: Purl across.
Row 2 (Right side): Knit across.
Rows 3-6: Repeat Rows 1 and 2.
Bind off all sts in purl.
Cut yarn, leaving a 8" (21 cm) end. Thread yarn needle with the end, fold Ear in half diagonally and sew edges together; fasten securely, leaving yarn end for sewing.
Tail
With B, cast on 3 sts.
Row 1 (Right side): Knit across, slide sts to opposite end of needle, do not turn.
Rows 2-15: Repeat Row 1.
Cut yarn, leaving a 8" (21 cm) end. Thread yarn needle with the end and weave through remaining stitches, draw up firmly; fasten securely.
FINISHING
Using photo as a guide and threading yarn needle with long cast on and bind off ends, assemble Tiger. Sew Head, Legs and Tail to Body. Sew Ears to Head.
Using photo as a guide and threading yarn needle with a 12" (30 cm) length of C, embroider stripes. Thread yarn needle with 12" (30 cm) length of C or embroidery floss and embroidery needle, embroider Eyes, Nose and Mouth on Head.
ABBREVIATIONS: K = knit; mm = millimeter; P = purl; st(s) = stitch(es); tog = together; ( ) = follow instructions in parentheses as indicated.
If you'd like to see more holiday patterns, take a look at the new "Have a Red Heart Holiday: 20 Knit & Crochet Gifts and Decorating Ideas" eBook from Red Heart Yarns.
Find more craft projects and tutorials from Craft Company Red Heart Yarn.
Read NextWinter Queen Teapot Cozy
Your Recently Viewed Projects
mrslizzyrose 55807 75
Nov 29, 2014
this pattern says its both knit and crochet but all i see is knit instructions i would like to make it but i dont knit so where are the crochet instructions thank you liz Rose
FaveCrafts Editor JL
Dec 01, 2014
Hi there, Unfortunately the crochet pattern for this project is unavailable. I have changed the pattern category to knitting and deleted mentions of crochet. Thanks so much for your patience and sorry for the inconvenience. - Julia from FaveCrafts
JKJ1117 0118318
Nov 02, 2013
I was looking for crochet patterns & this said it is crochet & knit pattern, but only gives knit directions---how can I get crochet pattern?
Report Inappropriate Comment
Are you sure you would like to report this comment? It will be flagged for our moderators to take action.
Thank you for taking the time to improve the content on our site.

