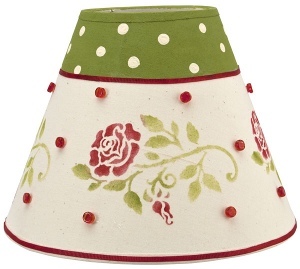
Retro Rose Lampshade
Spruce up your living room by adding a retro rose lampshade that you can make yourself! DIY lampshades are a great way to inject your personality into a room, so try these lamp craft projects.

Materials:
- DecoArt Stencil Paint
- SP502 - Buttermilk
- SP505 - Santa Red
- SP513 - Light Green
- Water container
- Palette or plastic plate
- Paper towels
- Rose stencil
- Stencil brush
- 3/4" flat brush
- Painter's tape
- Ruler
- Scissors
- 1/8" red ribbon
- Red beads
- Fabric glue
- Pencil or fabric transfer pen
- Linen lampshade
Instructions:
Note: Allow to dry between steps.
- Measure approximately 3" down from top of shade and mark lightly with pencil or fabric transfer pen.
- Center stencil image between pencil line and bottom of shade. Secure with painter's tape.
- Use stencil brush to pounce Santa Red in flower design and bud.
- Use stencil brush to pounce Light Green in leaf and stem designs.
- Lift stencil and reposition about 1" from first image. Repeat applicationaround lampshade for four flower images.
- Use flat brush and Light Green to paint 3" border at top of shade.
- Use brush handle end to dot Light Green section.
- Position and adhere ribbon around base of shade and Light Green border.
- Position and adhere beads randomly, if desired.
Read NextBeautiful Flea Market Coffee Table