Your Kids are in Bloom
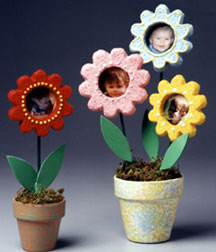
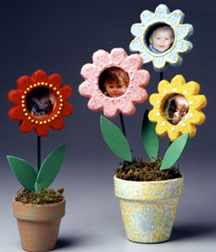
Watch your children grow by using the Flower Power photo frame. In six easy steps you can see your kids all day long.
Materials:
- STYROFOAM Brand Products:
- Sheet, 12" x 36" x 1/2"
- Ball, 2"
- Clay pot, 2"
- Wooden dowel, 1/8" x 8"
- Craft foam, one green
- Acrylic craft paint: bright red, Christmas green, blue-green
- Dimensional paint, yellow
- Varnish, matte finish
- Cardstock, 2-1/2" square, red
- Cardboard, 2" square
- Metal cookie cutters: 3-1/4" flower; 1-1/2" round
- Pencil
- Scissors
- Ruler
- Paintbrush, flat
- Natural sponge
- Thick white craft glue or low temperature glue gun and glue sticks
- Glue stick
Steps:
- Cut a 1-5/8" diameter circle from 2" cardboard square. Select photo with a 1-1/2" diameter live area (if you would like to preserve the original photo, make a color photocopy). Center cardboard circle over live area on photo and trace around edge; cut out photo. Center and glue photo to cardstock; cut out around photo, adding 1/8" all around edge.
- Firmly press flower cookie cutter into foam. Gently remove foam flower from cookie cutter; sand any rough edges with a scrap of foam. Cut out center of flower with 1-1/2" round cutter.
- Paint flower bright red and wooden dowel Christmas green. When dry, decorate flower with dimensional paint. Sponge paint pot blue-green; when dry, apply varnish.
- Glue photo and wooden dowel to back of flower.
- Glue foam ball in flower pot; if foam ball does not fit, roll on tabletop to reduce size. Insert dowel rod in ball. Glue moss over ball.
- Using pattern, cut two leaves from foam sheet. Glue to stem.
®™ Trademark of The Dow Chemical Company ("Dow") or an affiliated company of Dow. For more project ideas, please see styrofoamstyle.com.
Read NextEasy Painted Pots for Mom

