Anchors Aweigh Necklace
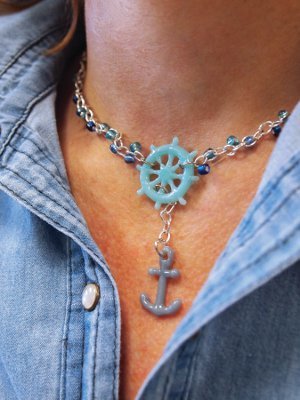
Get swept up in the magic of the sea with this Anchors Aweigh Necklace. Made using Fuseworks Polar Fuse Casting Molds and a microwave kiln, this handmade necklace design is great for pirates, mermaids, and sailors alike! You could even make a matching pair of earrings or a charm bracelet if you're feeling extra creative.

Materials:
- Fuseworks™ Microwave Kiln
- Fuseworks™ Hot Mitts
- Fuseworks™ Kiln Paper
- Fuseworks™ Polar Fuse Casting Molds - Travel
- Fuseworks™ Polar Fuse Glass Casting Medium - Fun
- Needle Nose Pliers
- 6 - 9 mm Jump Rings
- 2 - Crimp End Cap
- 1 - End Clasp Set
- Assorted Blue Seed Beads
- 18” Silver Cable Chain (divided into 2 - 8 1/2” pieces and 1 - 1” piece)
- Clear Jewelry Wire (cut into 2 - 20” pieces)
- Small Mixing Cup
- Mixing Spoon or Small Spatula
Instructions:
-
In a disposable cup, mix 1 teaspoon of turquoise Polar Fuse glass casting medium with a small amount of water (preferably distilled) until mixture is the consistency of wet sand. Pour the slurry into the helm mold and even it out. Tap the mold to allow the air bubbles to rise to the surface and wick away excess moisture with a paper towel. Place in the freezer for 20 - 30 minutes.
-
Cut a 2” X 2” piece of kiln paper. Remove the lid from the Fuseworks™ Kiln. Place the kiln paper on the kiln base. Remove mold from freezer, remove the helm from the mold and immediately place in the center of the kiln paper. Allow to rest 20 - 30 minutes.
-
Carefully set the base with glass inside the microwave and cover with kiln lid. Fuse at 100% for 2 minutes and using Hot Mitts, carefully lift the lid and check the fusing progress. If it is not fully fused, continue to microwave at 15 second increments until the glass slightly glowing and detail is still visible.
-
Remove kiln from the microwave, using Hot Mitts, and place it on a heat resistant surface. Cool the kiln for at least 30 minutes WITH THE LID ON. CAUTION: Removing the lid or peeking under the lid during the cooling stage may result in your piece cracking. Glass remains hot for a long time handle with great care.
-
Repeat steps 1 - 4 for the anchor using light grey. Each additional piece can be mixed, frozen and thawed in the time it takes for the previous piece to cool. Remember to allow kiln to completely cool before reusing.
-
While glass is cooling, snip a length of 18” silver cable chain into 2 - 8 1/2” pieces and 1 - 1” piece. Cut two pieces of clear jewelry wire into 20” lengths. Thread clear jewelry wire through the first link of 8 1/2” chain, leaving a 10” tail at the end. At this time you can tape the tail to hold it in place while you thread your beads.
-
Thread a seed bead onto one end of the wire and weave the wire through the opening, two links up from where you began. Add another seed bead, alternating colors and continue to weave and add beads until you reach the end of the chain. Once you reach the end, tape to hold wire in place while you tread the second half of the wire.
-
Repeat step 7 and thread the remaining length through the chain. Once you have reached the next to last link, thread the two ends of the clear wire through a crimp end cap. Position the cap in line with the last link and, using needle nose pliers, crimp the end.
-
Open a jump ring and thread it through the crimp end cap and last link of the chain, join it with one end of the clasp set, pinch jump ring closed to secure.
-
Repeat steps 7 - 10 on the other side of the necklace.
-
When glass is cool, use a pair of needle nose pliers to open a jump ring and thread it through the spokes of the helm and the non-clasp end of the beaded chain, pinch the jump-ring closed to secure. Repeat on the opposite side of the helm.
- Open a jump ring, attach the 1” piece of chain to it and thread it through the spokes of the helm, between the two chains and pinch the jump ring to secure. Add the last jump ring to the bottom of the chain, thread the jump ring through the opening at the top of the anchor and pinch the jump ring closed.
Read NextTee Shirt Beaded Necklace

