Chalkboard Wall Calendar
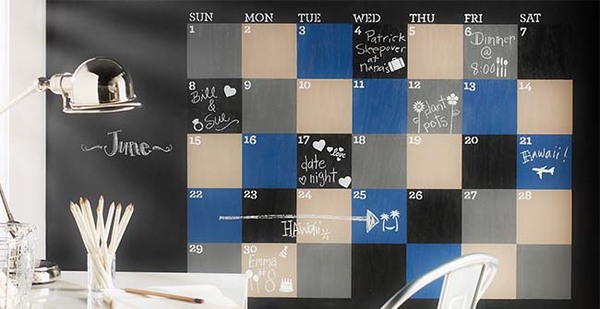
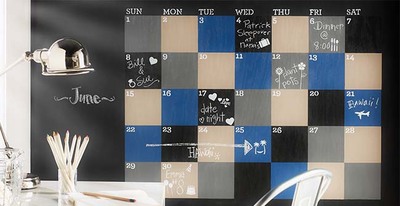
Make your office area unique and colorful with the Chalkboard Wall Calendar. You actually paint this calendar directly onto your wall with this craft, so it will be a permanent calendar for you to use. This craft would be a good project to complete over the course of a weekend because it requires some patience with drying paint. Painting crafts can seem like a hassle, but this DIY calendar will make your life easier to organize month-to-month. At the end of the process, you will have a cool calendar that you can erase each month and start with a clean slate.
Primary TechniquePainting

Materials:
- Martha Stewart Crafts ® Roller and Tray
- Martha Stewart Crafts ® Foam Pouncers Set - 6pc
- Martha Stewart Crafts ® Large Brush Set - 4pc
- Martha Stewart Crafts ® Stencil Tape
- Martha Stewart Crafts ® 2oz Multi-Surface Chalkboard Paint Acrylic Craft Paint - Black, Gray, Arrowhead, Ink
- Martha Stewart Crafts ® Laser-Cut Stencils - Calendar
- Martha Stewart Crafts ® 2oz Erasable Liquid Chalk, White
- Ruler
- Pencil
- White chalk stick
Instructions:
- Tape off desired Section on wall that you would like to make chalkboard calendar area.
- Using Roller and Black Chalkboard Paint, paint area and let dry.
- Pencil off area that is 28 x 20”, create a grid each box being 4 x 4” squares as shown in photo.
- Using first color- Chalkboard Paint Gray- tape off squares that you would like to paint gray (*be random not a repeat pattern) Let dry. Repeat step with all colors, Ink, Arrow Head. Leave some squares Black. *Remember to let paint dry before moving to next color and applying tape.
- Place stencil designs- numbers and days, as shown in photo. Using small pouncer and Erasable White Chalk Paint, Stencil designs onto wall as shown, Let dry.
- Add Icon designs where desired also with Liquid Erasable Chalk. Let dry.
- Add personalization with white chalk stick.
Read NextDIY Rustic Barn Wood Sign

