Gorgeous Starry Side Table
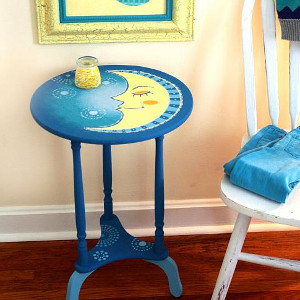
There are so many painted table ideas for children's rooms and nurseries that it's hard to find one that truly stands out and is uniquely yours. This Gorgeous Starry Side Table, however, is a DIY chalk paint table that can be the perfect touch for that bare room. The stars and moon are so soothing in a bedroom, and this Gorgeous Starry Side Table will give it such an element of enchantment that you may want it for your own room. Grab the paintbrushes and capture the magic of the nighttime sky right onto an old piece of furniture.
 You can find this project, and many more just like it, in our new free eBook, How to Paint Furniture: 19 Upcycled Furniture Projects free eBook from DecoArt!

Materials:
Americana® Decor™ Chalky Finish Paint
- Delicate (ADC11)
- Escape (ADC20)
- Inheritance (ADC12)
- Legacy (ADC21)
- Serene (ADC18)
- Treasure (ADC19)
Americana® Decor™ Varnishes
- Soft-Touch Varnish (ADM03)
Americana® Stencils
- Kaleidoscope Accent (5" x 7") (AS09)
Other supplies
- Palette or plastic plate
- Paper towels
- Pencil
- 2" flat brush
- #8 round brush
- Sea sponge
- Cosmetic sponge
- Round wooden table (flea market find)
- Pattern
Instructions:
- Using the 2" flat brush, paint the table legs with Legacy.

- Using the 2" flat brush, paint the bottom portion of the legs in Escape.
- Starting from the center of the table top, use a sea sponge to dab on these colors: Serene, Escape, Treasure, and Legacy, in a circular motion.

- Repeat the above step for fuller coverage.
- Trace the moon pattern onto the table top with a pencil.
- Using a #8 round brush, paint the perimeter of the moon in Delicate and switch to a 3/4" flat brush to fill it in.

- Add details to the moon using a #8 round brush. Refer to photo for color placement of Legacy, Inheritance, Delicate, Escape, and Serene. (Optional) Add dotted lines and dots around the perimeter of the moon. (Refer to photo for placement.)
- For the starry accents, use the Kaleidoscope stencil and dab on Serene with a cosmetic sponge to the table top. (These can be placed randomly or refer to the photo for placement.)
- Repeat the above step to the bottom section of the table.
- Using a 2" flat brush, seal the table with two coats of Soft Touch Varnish
Read NextSuperhero DIY Dresser Makeover

