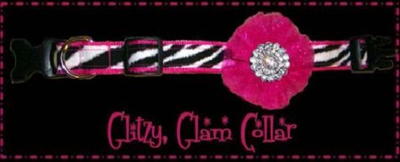
Glitzy Glam Adjustable Dog Collar
Make a stylin, glamorous collar for your favorite pampered pooch with this pet craft project by Valeria Blackburn. Follow the size chart below for width/length of webbing, ribbon and buckle size to purchase. The flower is the same size for all collars. Collar matches the Glitzy Glam Dog Leash.

Size Chart:
- 12”-15” neck- 24” long x 1” wide webbing, ribbon; 1” hardware set
- 8”-11” neck- 22” long x 1” wide webbing, ribbon; 1” hardware set
- 6”-10” neck- 18” long x 5/8” wide webbing, ribbon; 5/8” hardware set
- 4”-6” neck- 15” long x ½” wide webbing, ribbon; ½” hardware set
Materials:
- 24” or less of nylon webbing
- 24.5” or less of contrast ribbon
- ¼ yd. glitter tulle
- 1 rhinestone button, approximately 1”
- 1 small elastic band
- Collar hardware set (plastic side release buckle with “sliplock”, plus metal “D” ring
- Sewing machine
- Coordinating thread
- General sewing tools & iron
- Butane lighter
Instructions:
Basic Collar
- Cut webbing to length indicated in chart for the size collar being made.
- Add ½” to length of webbing measurement; cut ribbon to length.
- Carefully melt short ends of webbing with lighter to prevent fraying.
- Turn under ¼” on short ends of ribbon; press.
- Lay webbing right side up; lay ribbon right side up over webbing; pin in place.
- Topstitch ribbon to webbing 1/8” inside edges of ribbon.
- See photo below to identify buckle parts to assist in threading on collar:

- When topstitching buckles to collar, sew over top of first stitching 2-3 times for strength.
- Lay collar wrong side up on work surface.
- Thread the right end of the collar over the right end of the “sliplock” buckle, over the middle leg to a length of 1”. Topstitch end ¼” from edge of collar.
- Thread the left end of the collar up through the bottom, over the middle leg and out the opposite end of the male end of the side release buckle.
- Continue pulling collar though, threading it through the “sliplock” buckle, going over the top of the middle leg and previously stitched end, pulling it out at the opposite end.
- Pull end of collar through top of female end of side release buckle, over the leg to wrong side. Pull until there is a length of 2” on wrong side of collar.
- Topstitch through collar ¼” away from end of female buckle.
- Thread “D” ring on collar; stitch ¼” from end of collar.
Flower Trim
- Rotary cut three strips of tulle to the following measurements: 3”x16”; 2.5”x16”; 2”x16”.
- Right sides together, seam the short ends of each strip together.
- With a warm iron, press seam to one side. Begin folding the 3” wide strip in half horizontally with right sides out, pressing fold in place. When pressing, use extreme caution- a too warm iron will melt tulle.
- Repeat for remaining two strips of tulle.
- Layer the strips one on top the other, with the widest on the bottom, then the middle strip and the narrowest strip on top. Pin together.
- ¼” from raw edges, sew one row of basting around strip, through all layers, keeping raw edges even.
- Sew another row of basting ¼” from first row.
- Pull up gathering tightly, until there is no hole in the center. Tie off threads.
- By hand, sew button to center of flower; sew elastic band securely to back center of flower.
- To finish collar, adjust to proper length. Thread flower over collar to desired position.
Read NextRecycled Denim Dog Toy
Your Recently Viewed Projects
lanelane
Mar 13, 2011
i think this is soooo cute and i am going to amke one for my dog i love it <3
gyngersf
Dec 17, 2010
That is SO cute! I love it, and it would match my dog's personality: girly and pink!
Report Inappropriate Comment
Are you sure you would like to report this comment? It will be flagged for our moderators to take action.
Thank you for taking the time to improve the content on our site.

