Clay on Canvas Wall Art
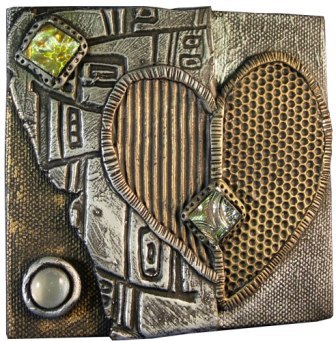
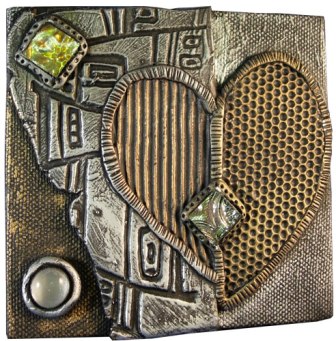
Create a miniature art canvas with polymer clay shapes and accents such as beads and buttons. Use cookie cutters to help you create shapes with the clay and household items such a comb to create texture. This project comes to us compliments of Heidi Borchers for Inspired at Home.
Materials:
- Polymer clay
- Canvas 4” x 4”
- Polymer clay
- Pasta machine (dedicated to clay use only) or a rolling pin on freezer paper
- Rubber stamps or texture sheets – assorted designs – or household utensils
- Baby powder (or cornstarch)
- Knife or clay type blade for cutting clay
- Cookie cutter for heart shape
- Non stick baking sheet (dedicated to clay use only)
- Acrylic paint - black
- Brush – ½” flat
- Rub ‘n Buff Metallic Paste - gold & silver
- Assorted beads, charms, and glass mirror pieces to embed into clay
- Aleene’s® Platinum Bond™ 7800 All-Purpose Adhesive
- Oven
Instructions:
- Soften (condition) clay by running through pasta machine several times (or roll out with rolling pin). For final thickness you will need about 1/8’ thick.
- Place onto freezer paper or a non stick baking sheet while creating design. Determine and cut size, shape and placement in order for clay piece to fit on canvas.
- Prepare rubber stamps by sprinkling with baby powder and shake off excess. Carefully push prepared rubber stamp into clay. For heart shape, use a cookie cutter and cut out clay. Overlap pieces and press beads and charms or mirrors into clay.
- Roll out several long snake type pieces and flatten out. Imprint with lines using knife. Press around stamped heart, beads, charms and mirror pieces.
- Place clay piece in oven and bake according to package directions.
- When clay piece is cool, glue onto canvas. Let glue dry.
- Paint entire canvas and baked clay piece with black acrylic paint. Let dry.
- Apply Rub n Buff according to package directions. Let dry.
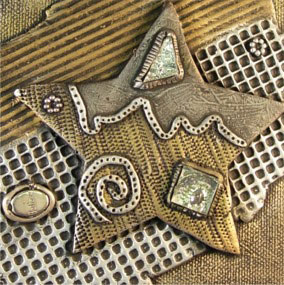
Heidi's Designer Tips: If you don’t have rubber stamps, you can use household items. Look for intriguing patterns in decorative buttons and kitchen utensils. For the lined pattern on the heart, I used a comb. Also, it’s easy to change up the design with different cookie cutter shapes!
Read NextHow to Make Polymer Clay Fairy Doors
Your Recently Viewed Projects
Marilyn B
Jun 05, 2017
This project is super and really opens up your creativity and artistic abilities! I love using different found textures by using Everyday items found around the house. You could also add tiny glass beards or pearls as well as buttons depending on the look you want. What a wonderful gift this would make, or even a party favor or hostess gift! Thanks for sharing this lovely Idea!
M Altenberg
Mar 14, 2017
Love this project. Looks like a piece I might have bought at a gallery or retail store. Looking forward to trying to make this.
Mary Harris
Dec 01, 2016
This looks like it would be perfect to make as a gift for a teen or college student for their room or dorm. It has a very industrial look to it that seems to appeal to that age group. I think it would be a lot of fun to make. It lends itself well to adding your own touch as well.
Pat P
Dec 27, 2009
This would look good on a journal cover or on top of a small box (example a cigar box or craft store box) for storing small items like jewelry or little treasures. Maybe even on the frame of a small wall mirror. This project has a lot of visual interest because of the varied textures and shapes which adds to its attractiveness versatility. I could also see using it with candles by placing it around a votive glass. The light could reflect behind the star and give it's shadow a dancing effect.
Report Inappropriate Comment
Are you sure you would like to report this comment? It will be flagged for our moderators to take action.
Thank you for taking the time to improve the content on our site.

