California Poppy Quilt
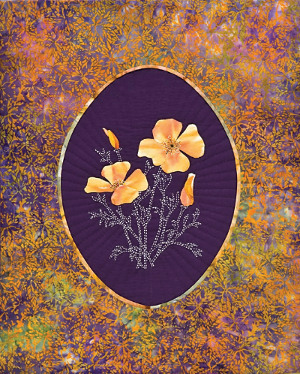
Bring a slice of paradise into your home with this colorful California Poppy quilt from C&T Publishing. Use the oval-framed poppy as a centerpiece for a full-sized quilt, wall-hanging, pillow or bag. This project is an excerpt from Paradise Stitched—Sashiko & Appliqué Quilts by Sylvia Pippen, which includes 6 vivid quilts inspired by tropical flora and fauna.

Note: Yardage based on 42˝-wide fabric.
Materials:
- 1/2 yard dark solid for background
- 5/8 yard orange-purple batik for border
- 1/2 yard mottled brown-orange batik for bias inner border
- 1/3 yard or scraps of streaked white-yellow-orange for poppies
- Scraps of dark brown-orange for buds
- ¾ yard cotton for backing and facings
- 20˝ × 24˝ piece of low-loft batting
- White design transfer paper
- Japanese Sashiko needle or any sharp needle with a big eye
- 1 skein white Sashiko thread or #5 perle cotton
- 6-strand cotton embroidery thread—black, gold, yellow
- Chalk pencil
- Thread for machine or hand quilting
Download the quilt patterns here. (pdf)
Instructions:
Cutting:
All measurements include ¼ ˝ seam allowances.
Dark solid fabric:
- 14˝ × 17˝ for the background
- Orange-purple batik:
- 1 rectangle 19˝ × 23˝ for the outer border
Brown-orange batik:
- 1 bias-cut strip 1˝ × 40˝ for the inner border
Backing and facings fabric:
- 20˝ × 24˝ rectangle for the backing
- 2 strips 21/2 ˝ × 201/2 ˝ for side facings
- 1 strip 21/2 ˝ × 17˝ for bottom facing
- 1 strip 5˝ × 18˝ for top facing/sleeve
Note:
The project instructions are written for hand appliqué. For fusible machine appliqué, reverse the appliqué patterns, trace them onto the paper side of fusible adhesive, and fuse. Do not add the turnunder allowances.
Transferring the Design:
Center the California Poppies pattern (see patterns pdf) on the dark background and transfer the design. Do not transfer the oval.
Preparing Appliqués:
Choose your favorite technique from the Appliqué Methods Using the patterns, prepare and cut out pieces 1–12. Add a 3/16˝–1/4˝ turn-under allowance for hand appliqué.
Appliquéing:
- Appliqué poppy petals 1–4 and 5–8 and buds 9–10 and 11–12 in order onto the dark solid
background. - Press from the wrong side.
Embroidery Embellishment:
Using the pattern, mark the centers of the poppies with a chalk pencil. With one strand of black floss, stem stitch the center of poppy 1–4. Stem stitch the stamens of both poppies in gold. Add a bright yellow French knot at the end of each stamen. Work the poppy stems and leaves in Sashiko
Adding the Oval Border:
Preparing the Appliquéd Background:
- Fold the appliquéd fabric in half lengthwise and then in half crosswise; lightly press the creases. The creases form registration marks for the center of the top, bottom, and sides.
- Trace the pattern oval onto freezer paper and fold in half lengthwise and then in half crosswise. With a pencil, mark the center of the top, bottom, and sides.

- Cut out the freezer paper oval (oval template).
- Place the oval template shiny side down on top of the appliquéd piece, lining up the marks and creases to center the oval. Lightly iron and pin in place.
- Use a chalk pencil to trace around the freezer paper oval. Remove the freezer paper.
- With a ruler and a chalk pencil, measure and mark small dashes 1/4˝ outside of the traced oval. This will be the cutting line. Do not cut. Set aside.
Preparing the Border Fabric:
- Fold the border fabric in half lengthwise and then in half crosswise; lightly press the creases. Open and place the freezer paper oval template shiny side down on the right side of the border fabric, lining up the marks and creases to center the oval. Pin and iron in place.
- With a chalk pencil, mark the creases at the center top, bottom, and sides outside the oval. Trace around the oval and remove the freezer paper.
- Measure 1/4˝ all around the inside of the traced oval and mark with dashes. Carefully cut out this smaller inner oval from the border fabric.

Adding the Inner Border:
- Iron the 1˝ bias strip in half lengthwise, wrong sides together, to form a 1/2˝-wide double-fold bias strip.
- Place the bias inner border strip on the appliquéd piece with the folded edge toward the appliqué, and line up the raw edges with the dashed outer oval. Pin the inner border in place, starting at the bottom center of the oval. Hand baste and machine stitch 1/4˝ fromthe raw edge. Fold back the raw edges so the 2 ends meet at the bottom.

- With a chalk pencil, mark the top, bottom, and side registration marks on the inner border.
Adding the Outer Border:
- Place the outer border face up onto the appliquéd background with the inner border attached. Line up all registration marks.
- Pin in place around the oval, turning under 1/4˝ of the outer border fabric to just cover the machine stitching line in the center of the inner border and exposing 1/4˝ of the inner border.
- Appliqué the outer border in place.

Trimming the Background Fabric:
- Turn the quilt top to the wrong side. Trim the excess appliqué background 1/4˝ outside the oval on the dashed lines.
- Press the seams toward the outside.
Finishing:
- Layer and baste the quilt.
- With quilting thread that matches the background, quilt around all the appliqué flowers and buds and around the perimeter of the Sashiko, right next to the Sashiko stitches.
- Square up and trim the quilt to 161/2˝ × 201/2˝.
- Use the 21/2˝ × 201/2˝ strips to face the sides of the quilt.
- Use the 21/2˝ × 17˝ strip to face the bottom edge of quilt.
- Use the 5˝ × 18˝ strip to face the top edge and to complete the sleeve.
Read NextPretty Pretty Princess Quilt
Your Recently Viewed Projects
gandflor 7799166
Mar 01, 2012
Looks great, we will see what happens- on California Poppy Quilt-
Crafter 15945
Nov 09, 2010
Good Morning; I am having trouble with the printed link to pdf downloads. The browser is IE 8. It always says it can not display the page. California Poppy Quilt is the pattern I have been trying to download. Thank you for your help. vmfarrell@hotmail.com
Report Inappropriate Comment
Are you sure you would like to report this comment? It will be flagged for our moderators to take action.
Thank you for taking the time to improve the content on our site.

