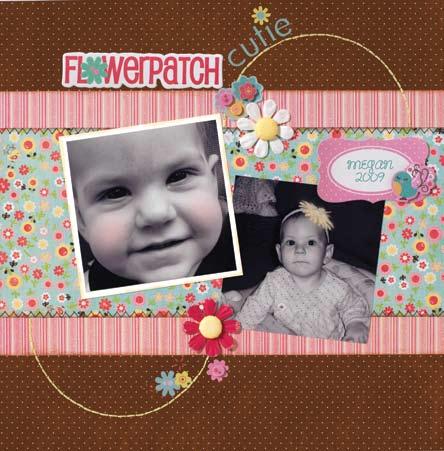
Flower Patch Cutie Layout
Use the Lucy bird collection of papers to create an adorable flower-filled scrapbook layout for your little cutie. The Chickadee chipboard adds personalization to the scrapbook layout from Imaginisce.

Materials:
- 12” x 12” Flower Power (brown side) paper #001896
- 7” x 12” Daisy May (pink striped side) paper #001895
- 5" x 7" Daisy May (floral side) paper #001895
- 7" x 8" Pretty Maids in a Row (green side) paper #001894
- Flutter Phrase Rub-ons #001910
- Chickadee Chipboard Sticker #001907
- Sunshine Sticker Stacker #001908
- i-top Brad Maker Tool
- 2- Small Brad Daddies #001311
- Fancy Paper Blossoms #001754
- Sewing Machine (optional)
- Yellow Floss & Needle
- Chestnut Roan chalk ink, Clearsnap
Instructions:
-
Ink edges of all trimmed papers using the chestnut roan (brown) chalk ink.
-
Adhere Daisy May paper (striped side) to the background, approximately 2 1/2" from top edge.
-
Adhere Daisy May paper (floral side) over previous paper in center.
-
Using sewing machine, zig zag stitch with brown thread along bottom edge of Daisy May paper.
-
Hand stitch a 5" half circle on top section of layout and bottom section as shown. You may want to cut a 5" circle and temporarily adhere to layout to use as a guide.
-
Journal on sticker stacker journaling block and adhere to layout.
-
Place flower rub-ons and flower sticker stackers to layout.
-
Place "Flowerpatch" chipboard title along top of layout and cut apart "cutie" rub-on and place along hand stitched edge of circle at top.
-
Using iTop tool, create two small covered brads with light yellow scrap paper.
-
Place brad in center of dark pink and white flowers and place on layout as shown.
- Place photos on layout as desired. Those shown are 4" x 4" and one is mounted to a white cardstock mat.
Read NextOur Family Scrapbook Layout