Poinsettias Layout
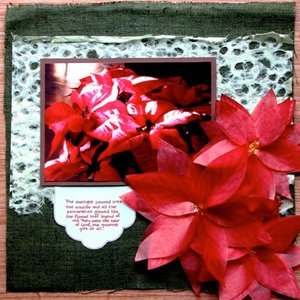
Whisk yourself away to a world of pure beauty with this Poinsettias scrapbooking layout from Sarah Hodsdon for Bic Markit. No memory should be forgotten, only cherished.

Materials:
- BIC Mark-It™ Permanent Markers (Rambunctious Red and Tiki Hut Tan)
- Decorative Cardstock
- Forest Green Canvas
- Light Green Handmade Paper
- BIC® Ecolutions® Glue Tape
- Craft Scissors and Craft Knife
- Gold Glitter Glue
- Tracing Paper
- 3D Glue Dots
- Tweezers
Instructions:
- Create an outline of a poinsettia on red cardstock and carefully cut out. The image does not need to be perfect, only a general shape is necessary. 1 larger image and 2 smaller images are needed.
- For each poinsettia bloom, create ten oblong leaves in Rambunctious Red on the tracing paper. Add color to them. Turn them over and add veins using the Tiki Hut Tan to add dimension.
- Carefully cut out the red leaves. Stick a glue dot in the center of the cardstock template made in step one. Using the tweezers, attach each leaf individually by sticking a pointed end into the glue dot. Stagger the leaves so the Poinsettia bloom appears fuller and more realistic.
- Dot the center with gold glitter glue for effect and set aside to dry completely.
- Layer image over brown cardstock. Place prepared piece on top of handmade paper. Glue handmade paper piece to the green canvas piece.
- Using a scrap of coordinating decorative paper, create a journal entry using the Rambunctious Red BIC Mark-It™ Permanent Marker. Add a decorative edge to the piece by adding a series of dots.
- Glue the poinsettia blooms to the prepared piece and adhere the journal element to the prepared piece in a pleasing manner afterwards.
Read NextMom Scrapbook Layout

