Rubber Stamped Background Paper
Are your scrapbook layouts looking drab? Make your own Rubber Stamped Background Paper for Theresa Cifali! This is an easy project that will perk up your project. No more searching for the perfect paper - make it at home instead!

Materials:
- White or a fairly light colored piece of card stock or scrapbook paper
- Permanent Ink (I like to use StazOn by Tsukineko)
- Dye based ink (I like to use Tim Holtz’s Distress Inks)
- Stipple brushes
- An assortment of rubber stamps
Instructions:
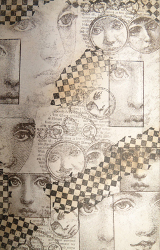
- The first thing you will want to do is take your largest images and begin to stamp those randomly onto your solid colored piece of paper. To make it interesting, stamp some of the images off the page.
- Something important to note….when using this technique, you want to make sure you are using PERMANENT ink. If you try to use dye inks to stamp your background, they will smudge when you go to colorize it later.

- Next, stamp your medium and smaller stamps to fill in some of the white space. Again, use a random pattern and stamp some of the images so they are “hanging” off the page. Also, overlap your stamps. It looks really cool!

- Next, use a filler stamp, like the checkered patterned stamp I used below, to fill in some of the wider areas of white space. Overlapping images looks really cool, so don’t be afraid of it. Once you’ve done that, it should look something like this:

- I think that looks pretty good, but there is still too much stark white space. To deal with that, I used this textured stamp and stamped it all over the areas where there were white gaps. This creates texture and makes the over all look much softer.

- Create texture by randomly stamping this type of image over stark white areas of your paper.
- If you don’t have a textured stamp in your arsenal, that is just fine! You can create texture in other ways. You can “stamp” with the following: a stipple brush and tap the bristles onto the paper, a crumpled piece of wax paper or even tin foil, a piece of steel wool, the scrubby side of a sponge, a sea sponge (which will be right by the sea shells in your local craft store).
- Once you have added the texture, your paper will look like this.

- I think this is really pretty. In some circumstances I would leave it just like this, however, this paper was going to be used in a vintage style layout, so I added some color using Tim Holtz’s Distressed Inks.
- Using my stipple brushes (ya know I can’t help myself!), I stippled the lightest color first using a sweeping motion. Then I highlighted specific areas with the middle color. Finally, I used the darkest color just at the edges of the paper for some contrast.

We interviewed Theresa Cifali on FaveCrafts Radio and asked her about this project. Listen to the May 4 show to hear her tips and tricks.

