10 Minute Sewn Tote Bag
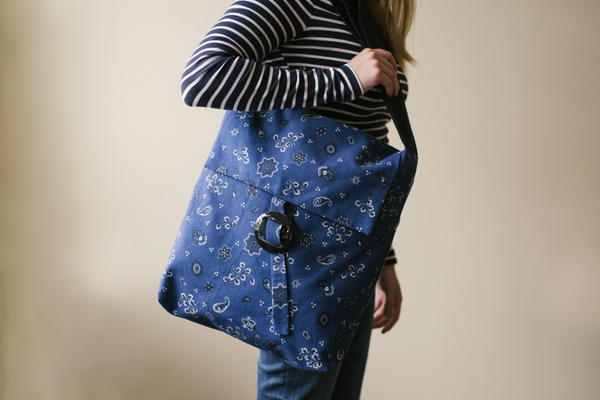
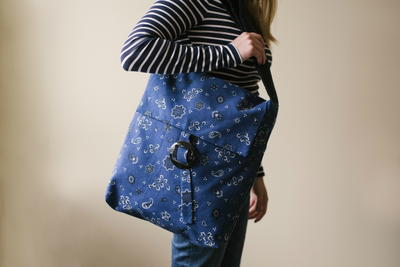
Want a fun and easy sewn bag that you can make in just 10 minutes? This 10 Minute Sewn Tote Bag is a fun and easy craft for you to make a quick and trendy bag. This DIY bag tutorial makes a messanger style bag that is perfect for carrying around when you are going on any trips where you need to carry a lot of stuff. Plus, the fun fashion fabric pattern lets you really create a DIY sewn bag that you can really make to fit your style!
Estimated Cost$11-$20
Time to CompleteUnder an hour
Primary TechniqueSewing

Project TypeMake a Project
Materials List
- 1 yard fashion fabric
- 1 ¼ yard heavyweight lining fabric
- 3” coconut shell buckle
- Thread
- Pins
10 Minute Sewn Tote Bag
Note on Materials: If your fabric has an even grain and a pattern that looks good in either direction you can use ¾ yard of the fashion fabric and the lining, but if it has a strong vertical/horizontal design element use the cuts above.
Messanger Style Tote Bag Instructions
Cut List: Fashion Fabric:
Bag Body – 17 “ x 35”
Flap – 13” x 9 ½”
Decorative Buckle Strap – 3” x 11 ½”
Cut List: Lining
Bag Body and Flap as above
Strap – 6” x 32”
Buckle Strap – 2 ½” x 11”
-
Take the fashion fabric that you are using for the body of the bag, you are going to fold them in half, and sew up both sides and leave the top edge open, leaving a 1/2 inch seam allowance.
-
Repeat this for the lining fo the bag.
-
Pin the right side of your fabrics for the flap, one cut of the fashion and one cut of the lining, facing, and sew along three sides of your flap leaving one long side open. Use a 1/2 inch seam allowance.
-
Clip the corners and turn the flap of your bag right side out, and press it.
-
Take the buckle straps and bag straps, fold them in half, long ways, sew them up the side with a 1/2 inch seam allowance. Then use the same technique to turn them right side out and press them.
-
At the bottoms of the bag, looking at the bottom corner where the fold is, grab both sides and pull it out so you have a triangle shape. Measure down 1.5 inches, make a mark, and holding it nice and flat draw a line across that mark.
-
Sew across that line, and then fold your triangle toward the fold and tack it into place.
-
Repeat steps 6-7 for the other corner of the fashion fabric, and both corners of the lining fabric.
-
Take your strap piece for weaving through the buckle, take one of the ends and put it down through the wrong side of the buckle and up through the right side of the buckle. Fold back about a half of an inch and lay that fold on top of the buckle strap and sew it shut by hand.
-
Have the right side of the fashion fabric for the body of your bag facing the right side of the lining for the body of your bag. Put your fashion fabric inside the lining.
-
Insert the big wide strap that is going to be used to keep the bag on your shoulder into the bag and pin it into place.
-
Measure equally from the two sides and make a small chalk mark to see where your buckle strap should be, and place the buckle so that the right side of the buckle facing up form the right side of the fashion fabric, and pin that into place.
-
Sew all of this together along three sides, starting at the the one short side, across the long side with all the buckles, and across the short side on the other side.
-
Turn your entire bag right side out.
-
Fold down the seam allowance along the back of the bag. Insert the flap so that the lining is facing the lining and the fashion fabric is facing the fashion fabric, and then sew all the way around the top of the bag.
-
Sew down the two sides of the buckle strap to secure it into place, and taking the other part of the buckle strap and stitch it onto the center of the flap so that your more narrow strap will go through the buckle.
Your Recently Viewed Projects
Harriet
Jun 26, 2017
I love that there is a video and I will certainly make this tote. I wish more people would add a video. It helps to visualize the instructions much better than photographs.
Marilyn B
Jun 05, 2017
Nice tote and great video. As an option, I would add some length to the buckle strap and pull the closure down farther away from the buckle so I could machine stitch it down because I hate to hand sew! It would ensure a better connection. On the triangle gussets I would use a t-square or L shaped ruler to get a 90 degree angle so it would set up better, but I do eye-ball stuff as well, and most likely not essential. I have made totes with zipper closures rather than flaps for another option. Thanks for sharing!
Weberme
Apr 02, 2017
I love love love this messenger bag and how much simpler can it get. I like making my own bags because I like to make mine as small or big as I want and the strap too. I really like the buckle on this bag and the way it is put together. I make bags all the time but this one is a little different and it closes. I also would like to put pockets in mine because this is a must for me. Great gift for a teen,collage student or for any adult. Great video and nice tutorial.
kay4643 6041773
Mar 28, 2017
Have been looking for a bag like this but not so big. I guess can make it to fit my style. Might try pockets inside.
brendajoyce 360145 0
Mar 27, 2017
VIDEO GOOD. WRITEN INSTRUCTIONS MESSENGER IS MISPELLED TWICE AND IN STEP 13 starting at the the one short THE IS REPEATED.
Toni
Mar 21, 2017
#NationalCraftMonth2017 I like this pattern, but I will try to modify so it is wider and not quite so deep. will post pix if I'm successful.
Sue LD
Mar 20, 2017
Great bag pattern. Simple enough that I could make it. #NationalCraftMonth2017
ridiculosity 67303 43
Mar 20, 2017
This bag turned out nice. There should be room for the whole computer in it! #NationalCraftMonth2017
Runeshadow
Mar 20, 2017
#NationalCraftMonth2017 Great Messenger bag! I don't usually like the ones with full-length flaps, so awkward opening, but this one with the flap going only part of the way down the side of the tote is great.
Report Inappropriate Comment
Are you sure you would like to report this comment? It will be flagged for our moderators to take action.
Thank you for taking the time to improve the content on our site.

