Car Seat Cover
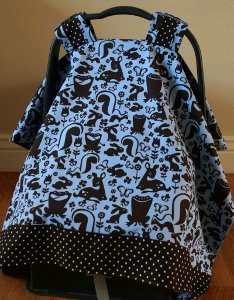
Use this free sewing pattern for a baby car seat cover to style your baby's car seat with a homemade touch. Now your baby can nap in peace!


Materials:
- 1 1/3 yards 100% cotton fabric or flannel for top
- 1 1/3 yards 100% cotton fabric or flannel for backing
- Sew on Velcro (I prefer not to use Velcro with adhesive, as it gums up my needle.)
- Fabric marking pen (either water erasable or disappearing) or fabric marking pencil
Instructions:
- Cut top and backing fabrics 35″ wide x 42″ long. If fabric has a directional pattern like my top fabric, make sure to cut it so it goes in the right direction. If you are piecing either the top (like I did) or backing, make sure the finished dimensions are still 35″ wide x 42″ long.

- Create curved corners by placing a bowl in the corner and tracing with fabric marking pen or pencil, as shown. Cut along tracing line. (This curved corner is more than just decorative, it serves to keep the cover off the ground on the corners. Next time around, I would use a larger bowl and take more off for the curve, as the corners in the front of the car seat touch slightly.)

- Cut straps 2 from backing and 2 from top 4″ x 9 1/2″. (I was piecing the straps, so my “back” polka dot fabric was 2″, and the “top” fabric was cut 6″ thereby making my finished strap the same dimensions.)
- If you want to do any piecing (like I’ve done), make sure finished dimensions are same as above.

- For the main body of the cover, place right sides of front and backing together, stitch together using a 1/4″ seam, leaving a small opening. Note: all seams are 1/4″ unless otherwise noted.

- Clip curved corners and turn right side out. I like using a chopstick all the way around the seam, as it makes for a nice edge. Press well.

- Using a scant 1/4 seam, stitch all the way around the outside edge to give it a finished look, and to close the opening.

- To make the straps place right sides of front and back fabric together. Stitch around, leaving one end open. (There are few added steps if you are making the straps pieced on top, like mine. I stitch down the length, leaving both ends open, I pressed the seams out, turned it right side out, and pressed so the straps looked even. Then I turned it wrong sides together again and closed one end. Then continue to step 9)

- Clip corners and turn right side out. (Again I use chopstick) Press well.
- Close opening. Repeat steps 8-10 for second strap.
- Fold straps to check placement of Velcro, pin and stitch into place. I made sure the end which I closed the opening was on the inside and therefore hidden.

- Press straps in half, to act as a guide. For placement of stitching on the straps (to adhere the straps to the body), measure 4 1/4″ inches in from both sides and draw a line with fabric marking pen as shown below.

- For placement of straps measure 19″ inches from the top and 11 1/2″ from each side. There should be about 5 1/2″ between each strap and about 21″ from the strap to the bottom. If you are visual like me, see Illustration for strap placement. Pin straps into place. Stitch and then reinforce stitching. (The stitching will be one inch apart, and I stitched in a box shape.)

Your Recently Viewed Projects
Sew Happy Learning
Feb 28, 2012
Absolutely FABULOUS!! Your instructions are great and your photos actually help!! Thank you so much for sharing!!
naomier
Sep 14, 2011
@ Char55 - I undertsand your concern, BUT I think this item can be used during the winter time or in the evening taking the child to and from the car. The velcrow straps allow it to be taken off to prevent poor ventilation once the child has reached it safe location. The fabric can be changed if flannel might seem too thick. I have a 3 year old with one on the way. This seems to be a great craft to make to color coordinate with baby themes and decor. I love it!
Liz13506 2072184
Jun 03, 2011
I love this its so cute and way safer than throwing a blanket over the car seat. For the rude comment its not made to leave on its made for when you take the car seat and baby out of the car on a windy,cold, or rainy day not to leave on the car seat all the time.
Sew Happy Learning
Feb 28, 2012
Great point, Liz!! I cannot tell you how many times, no matter how good I thought I had it, the darn blanket slipped right off right into the mud or puddle...AARRGGHHH!! LOL
Char55
May 11, 2011
This is not only a BAD idea it's a VERY DANGEROUS ONE Going by the pictures posted the cover is made from layers of fabric making it heavy enough to limit ventilation and overheat the child causing it to pass out from heat stroke Remember how hot you got as a kid when you pulled the sheet over your head during a storm This is as thick as TWO sheets A parent might forget the kid is in the seat and leave them in a hot car where they die There are too many parents who forget their kids in car seats already and that is when the kids are in plain sight think how many more would be forgotten napping under this thing It also prevents the mother from seeing if the child is in distress One should never completely hide a child from view what if the child spit…Read More up and started choking or was having trouble breathing The only covering that might make sense is mosquito netting because you can see through it it is light and it allows sufficient air flow
Sew Happy Learning
Feb 28, 2012
For the record, Char55, I don't think you were trying to be rude... I truly think you were sharing your honest perspective and were trying to help. As Liz indicates above, this cover is only meant for brief outdoor transport between the house and the car. I am sure others share your perspective and might not want to voice it and so I think it was great to be able to discuss it and for all ideas to be shared. Thank You!
Janetta86
Apr 03, 2012
It's main purpose is as a "greeter deterrant". It keeps unwanted hands from touching your baby. You wouldn't necessarily use it in the car, but while shopping, stuff like that.
Report Inappropriate Comment
Are you sure you would like to report this comment? It will be flagged for our moderators to take action.
Thank you for taking the time to improve the content on our site.

